

Today I written a beginners tutorial for converting objects from Sims 3 to Sims 4. For this tutorial you will need to have The Sims 3 installed on your computer and any expansions and stuff packs you would like to convert. I will be walking you through the conversion steps in sections, I will refer to other sections as I go so please follow this guide step by step. This tutorial is set up so that any creator at any skill level may follow easily.
You can find a forum thread here where you can ask any questions you may have about this guide.
For this tutorial you are going to need the following programs:
- Sims 4 Studio (*Registration Required)
- Blender
- TSR Workshop
Be sure to download and install these programs, if you have any questions on installing please ask.
Sections are as follows:
- Section One – Exporting TS3 Textures & Meshes with TSR Workshop
- Section Two – Exporting Sims 4 Meshes with Sims 4 Studio
- Section Three – Converting Sims 3 Meshes to Sims 4 with Blender
- Section Four – Importing Meshes into Sims 4 Studio & Tags

In this first section I will be teaching you how to how to ‘Export’ Sims 3 meshes and textures from TSR Workshop. If you have not already please download and install TSR Workshop.So, let’s get started.
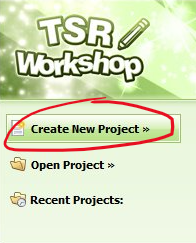
1. ‘Run’ TSR Workshop.
2. Click ‘Create New Project’ .
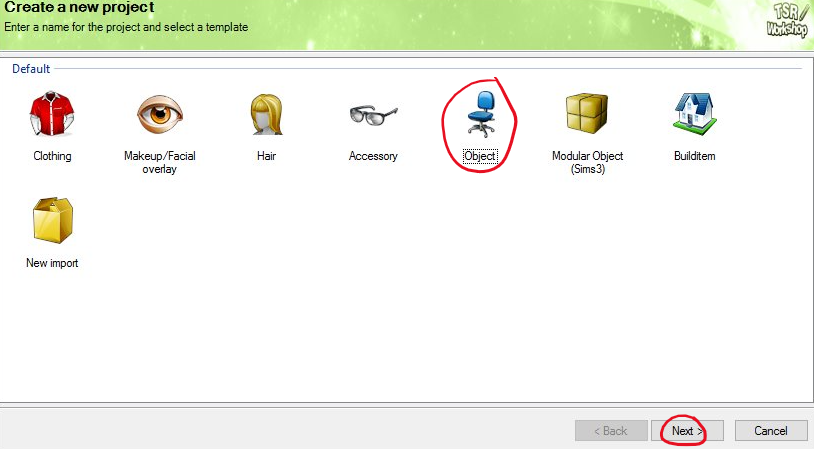
3. Click ‘Object’. Then click ‘Next’.
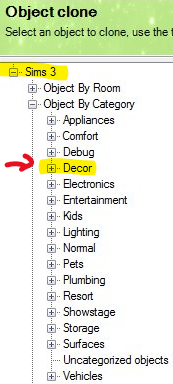
4. Scroll down until you see ‘Sims 3‘. ‘Click’ on the ‘+’ beside the word ‘Sims3’.
(Don’t click on the text, the program may crash.)

5. The first item we are going to convert is a decor item. Under ‘Sims 3’ scroll until you see Decor. Then
‘Click Decor’.
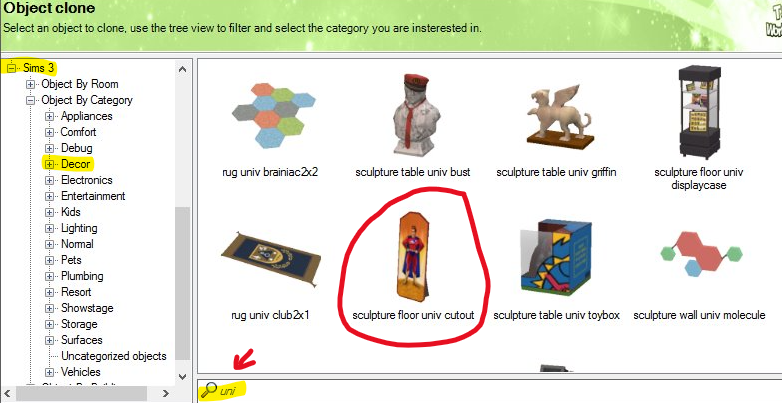
6. We are going to convert the ‘University Life’ floor cutout for this tutorial.
To search for this item, next to the ‘Magnifying Glass’ type in ‘Uni’. You will now see the ‘Floor Cutout’.
‘Click Sculpture floor univ cutout’ then click ‘Next’.
7. On the next page, you will see ‘Project Name’, ‘Title’, and ‘Description’. Just ignore this page, ‘Click Next‘.
8. Once you see ‘Finished’ at the top of the page ‘Click Ok’.
9. Now you should have a new screen with the ‘Model’ in the ‘View Window’. On the right side of the screen there is a Navigation bar with 5 tabs. ‘Click Textures Tab’.
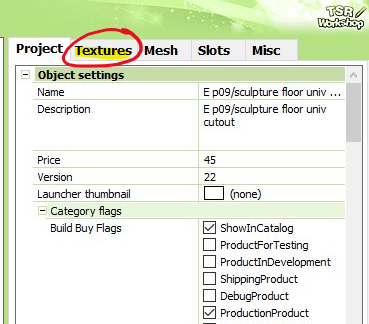
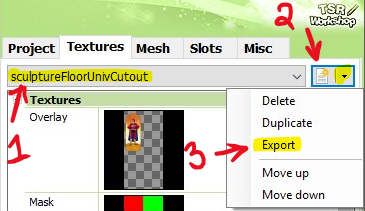
10. Under the ‘Textures’ tab, at the top you should see a drop down window and a box next to it with an icon of a piece of paper with a gold star and a drop down arrow.
-The first dropdown box is your textures. ‘Texture Box’
-The second icon is where your export button is located. ‘Icon Box’
11. Under the ‘Texture Box’ select the first texture in the list.
(You should see three textures listed in this box for this item.)
Next, click the arrow next to the ‘Icon Box’ and ‘Select Export’.
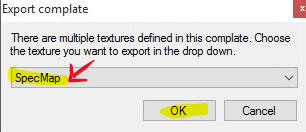
12. Now you have a pop up window, make sure it says “DiffuseMap’ in the drop down box. ‘Click Ok’
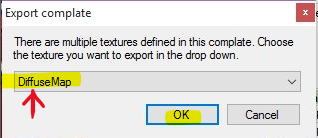
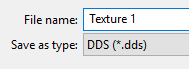
Next, name your texture. Save as .dds file. Then ‘Click Save’.
I recommend saving it to your desktop.
(This is where I will save all items from this point forward unless mentioned otherwise.)
13. Repeat steps 11 and 12 for the other textures in the drop down menu.
13a. You will need to do one last step under the ‘Textures Tab’. Export any of the textures again, instead of saving ‘DiffuseMap’ save as ‘SpecMap’. Name your spec map “Spec Map’‘ or something to distinguish the difference from the other textures you extracted.
14. Now that we have all of our textures and specular saved to out desktop. We need the mesh.
‘Click’ the “Mesh Tab’ next to the ‘Textures Tab’.

15. Under the mesh tab you will see a drop down menu that says “High Level of Detail’ this is your ‘LOD box’. Next to the LOD box is a icon with a box and a red arrow, this is your ‘Export’ button.
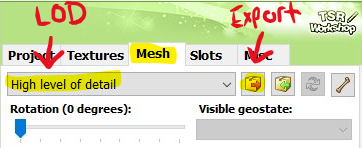
In the LOD box ‘Select High level of detail’ and ‘Click Export’ as pictured above.
Name your LOD, save as Wavefront Object (.obj)
(Be sure to save as .obj file, or you will not be able to open the mesh in Blender.)

16. You now have all that you need from TSR Workshop!
On your desktop (or where you saved the files) you should have:
- 3 .dds texture files
- 1 .dds specular file
- 1 .obj mesh file
You can now close TSR Workshop if you have all the above files saved.

In this section I will be teaching you how to how to ‘Export’ Sims 4 Meshes from Sims 4 Studio. If you have not already please download and install Sims 4 Studio. You will need to register for the site before you can download.For this tutorial section we will be continuing for section ones decor item. We will be extracting the base game pedestal mesh.For this tutorial I am using version: 2.5.1.6 (Joy) Open Beta VersionSo, let’s get started.
1. ‘Run’ Sims 4 Studio
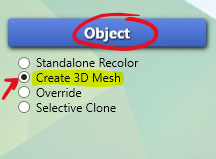
2. Under the ‘Object Button’ in the middle of the screen ‘Select Create 3D Mesh’. Then ‘Click Object’.
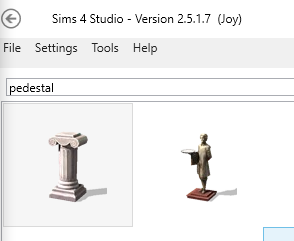
3. The next window that opens has a ‘Search’ bar at the top with a lot of icons listed underneath.
In the ‘Search Bar’ type in “pedestal” (without parenthesis)
The first icon should be: Roman Pedestal, from TS4 base game.
‘Select’ the pedestal and ‘Click Next’
4. Next, a pop up save window will appear. You will want to name this .package file and save it in your MODS folder.
I have named my .package TS3 cutout conversion.
Mods Folder Location: (Documents Folder > Electronic Arts > The Sims 4 > Mods)
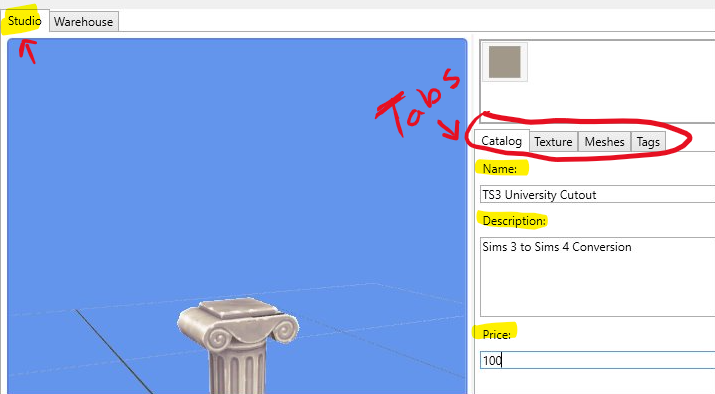
5. Now that you saved your new creation in your MODS folder. You should have a popup window with TS4 ‘Roman Pedestal’ in the display window. (If you do not see the display window ‘Click Studio’ on the top left of the screen.)
On the right side of the screen there are 4 tabs: Catalog | Texture | Meshes | Tags
‘Click Catalog Tab’ if you are not on that tab already.
This is where we will put a Name, Description and Price to our new creation.
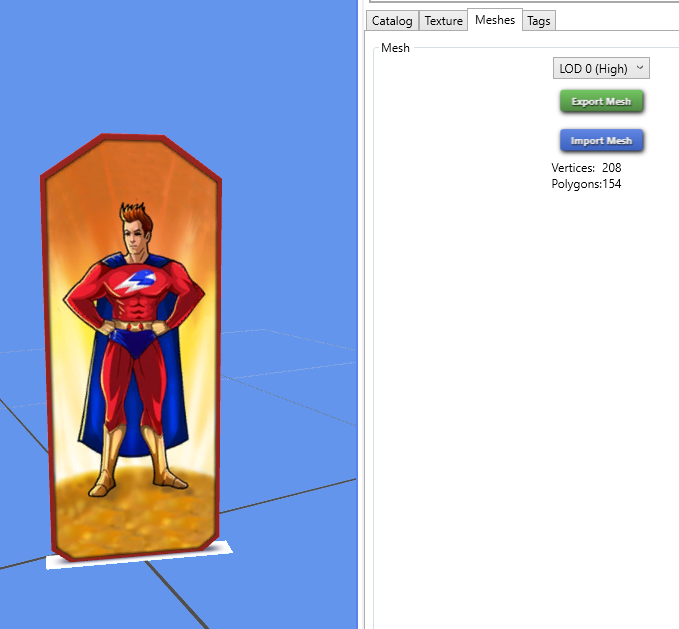
6. After you have put our new creation info in, ‘Click Texture Tab’
Under the ‘Texture Tab’ It should look like this:
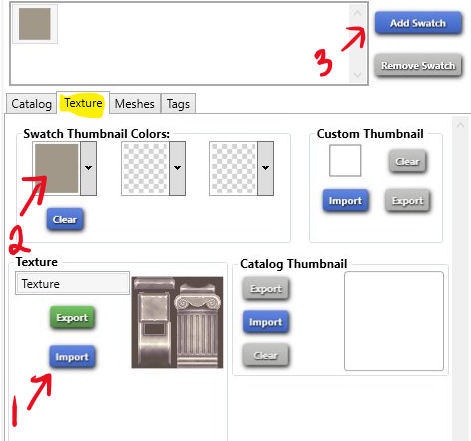
6a. First, Click ‘Import’ find your first texture .dds file select it and ‘Click Open’.
Now you should see the texture of the TS3 cutout on your pedestal.
Next, Right click the box with the “Swatch Thumbnail Colors” and this will create an eyedropper tool. With the eyedropper tool select a color on the model (I choose red).
6b. Click “Add Swatch” pictured above. Repeat step 6a for all other textures.
(There are 3 included with the TS3 Cutout from Section 1)
7. Now that we have all of our TS3 textures on our TS4 pedestal ‘Click Meshes Tab‘.
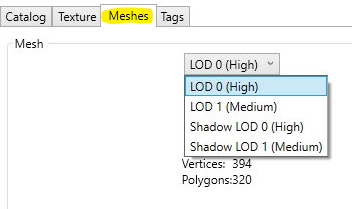
Now you will see a drop down menu that says ‘LOD 0 High’ select it and ‘Click Export Mesh’
Save the blender file to your desktop.
(I named mine ‘0 Pedestal Blend’)
8. You have now extracted your Sims 4 mesh!
On your desktop (or where you saved the files) you should have
From Section One:
- 3 .dds texture files
- 1 .dds specular file
- 1 .obj mesh file
From Section Two:
- Blender File
You can now minimize Sims 4 Studio, don’t close it we will be returning to it in a later section.

In this section I will be teaching you how to how to import your Sims 3 mesh into blender and convert it to Sims 4. If you have not already, please download and install Blender.For this tutorial section we will be continuing for section ones decor item and section two’s pedestal mesh.For this tutorial I am using version: Blender 2.75aSo, let’s get started.
1. ‘Open’ your TS4 blender file you saved in Section two.
In the blender ‘Preview Window’ you should see the Pedestal mesh with our TS3 texture on it.
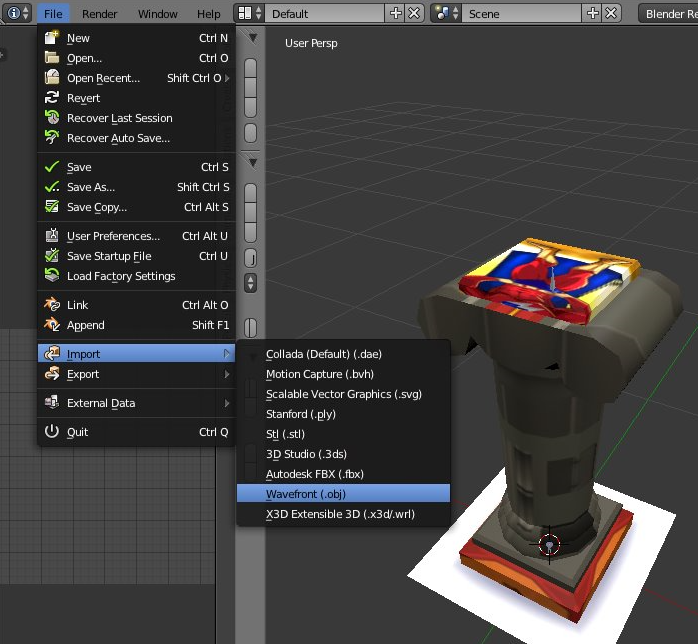
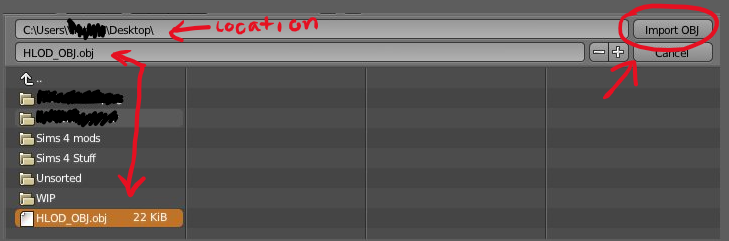
Next, Go up to ‘File’ > ‘Import’ > ‘Wavefront (.obj)
A save window will open once you click ‘Wavefront (.obj)” find your TS3 .obj file we saved to our desktop in section one.
‘Select’ your ‘Obj’ then ‘Click Import OBJ’
2.Now you should have your new mesh on top of the old pedestal mesh.
In the picture below is how your view window should look. I have pointed out in red where the items are that are important.
You have the
- Old Pedestal Shadow
- Old Pedestal Mesh
- New Cutout Mesh
- New Cutout Shadow
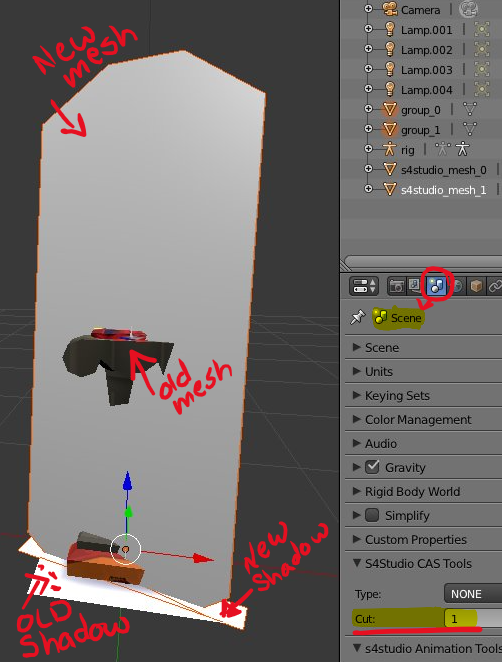
3. First, ‘Right Click’ the pedestal. On the right side of the screen you will see Cut: 1
(Remember this number)
Next, ‘Right Click’ the new mesh. Under the cut, it will be blank. Change the Cut number to 1 ‘Press Enter’.
(So the new mesh and the pedestal mesh both have the same cut number)
4, Lets ‘Right Click’ the pedestal shadow. On the right side of the screen you will see Cut: 0
(Rememver this number)
Next, ‘Right Click’ the new shadow. Under the cut, it will be blank. Change the Cut number to 0 ‘Press Enter’.
(So the new shadow and the pedestal shadow bot have the same cut number)
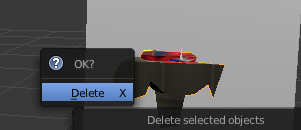
5. Now we need to get rid of the old mesh..
‘Right Click’ the pedestal the item will have an orange glow once it is selected. press ‘X’ on your keyboard then ‘Left Click’ Delete. (As pictured below)
6. Now we need to get rid of the old shadow.
‘Right Click’ the pedestal shadow now. press ‘X’ on your keyboard then ‘Left Click’ Delete.
7. Now your view window should look like the photo below
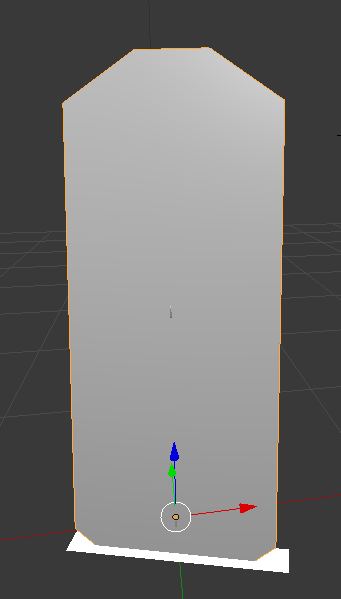
To double check, ‘Right click’ the new mesh, make sure it has the cut number 1. then ‘Right Click’ the new shadow, make sure it has the cut number 0.
If both the mesh and shadow have their cut numbers. You can now save your new blender file.
To Save: File > Save As > overwrite your old blender file
8. Now we have the mesh exported we need to also get the shadow LOD.
‘Right Click’ on the new mesh, change the cut number to 0. (Now your Mesh and Shadow have the same Cut number.)
Next, save your shadow LOD.
To Save: File > Save As > Save as ‘Shadow LOD’
You are now done with blender!
See that was not to bad! Blender is not that scary.
On your desktop (or where you saved the files) you should have
From Section One:
- 3 .dds texture files
- 1 .dds specular file
- 1 .obj mesh file
From Section Two:
- Blender File
From Section Three:
- New Blender File
- Shadow LOD Blender File
You can now exit blender. You will not be needing it again for this tutorial.

In this section I will be teaching you how to import your new mesh into Sims 4 Studio and explaining how to use tags and finish up your object to be used in game!So, let’s get started.
1. ‘Open’ Sims 4 Studio
(You should still have this program minimized from section two.)
2. Under the ‘Meshes Tab’ make sure you have LOD 0 (High) Selected.
‘Click Import Mesh’
A save window will open. Find your new blender file you saved in the previous section.
‘Select Blender file’ then ‘Click Open’
You should now see the new mesh in the preview window as pictured below
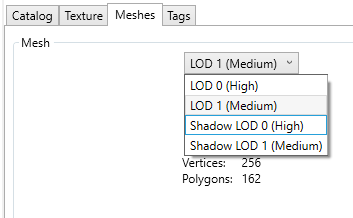
3. Now we need to ‘Click’ the drop down and select the next LOD
‘Select LOD 1 (Medium)’ then ‘Click Import Mesh’
The save window will open again, find the same mesh and import it for LOD 1 as you did in previous step.
So now, LOD 0 and LOD 1 both have the new mesh imported.
4. Next we need to import our shadow LOD
Under the ‘Meshes Tab’ make sure you have Shadow LOD 0 (High) Selected.
‘Click Import Mesh’
A save window will open. Find your shadow blender file you saved in the previous section.
‘Select Blender file’ then ‘Click Open’
Repeat this step for Shadow LOD 1 (Medium).
Once you have imported both of your Shadow LODs. Your preview screen should look like this

5. Select the LOD drop down one last time and ‘Select LOD 0 (High) ‘
So you can see the texture on the mesh.
6. Next to the meshes tab ‘Click Tags’
The tags section is how your item will be tagged in the game. So for this item we want to have a Decor Sculpture. But we also need to get rid of the tags for the original pedestal.
Below I am going to explain the Tags visible.
- Colors : This is where you can choose what colors you item will show up tagged in your game. So for this item we have three swatches. The three colors I choose were Red. Green, and Grey. So under the colors tag I would put a check next to those three colors. (If you do not want to tag colors uncheck all the boxes) Once you have your color tags the way you want them ‘Click Apply To All Swatches’
- Surfaces: This is no longer a surface item. ‘Un-Check Miscellaneous’ Under surfaces ‘Click Apply To All Swatches’
- Function: This tab tells you how an Item will function. This is no longer a functioning item. ‘Un-Check Pedestal’ under function ‘Click Apply To All Swatches’
So now that we have removed all of the old tags, we need to tag our new decor items.
Scroll down until you see Decorative ‘Select Decorative’ a drop down will appear ‘Check Sculpture’ and ‘Check Decoration (Misc)’ ‘Click Apply To All Swatches’
Now this means my item will show up in game under Sculptures and Miscellaneous Decor.
7. In the top left corner under “File” will be the ‘Warehouse Tab’
‘Select Warehouse Tab’
Scroll down until you see DST Image, it will have a grey thumbnail beside it.
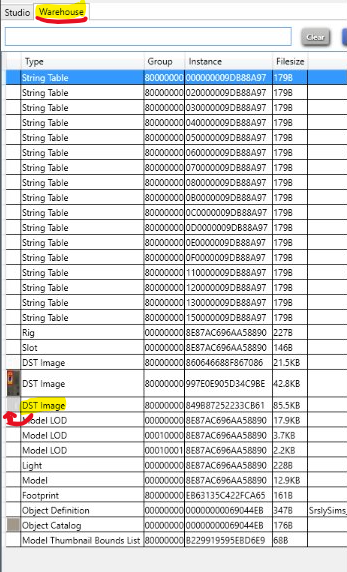
‘Select DST Image’ once selected on the right will be a grey image. This is your Specular.
On the bottom right you will see “Export” and “import”. ‘Select Import’.
Find your SpecMap you saved from section one.
‘Select SpecMap’ then ‘Click Open’
Now you should have a new specular in the preview window.
8. In the bottom right hand corner of Sims 4 Studio ‘Click Save’
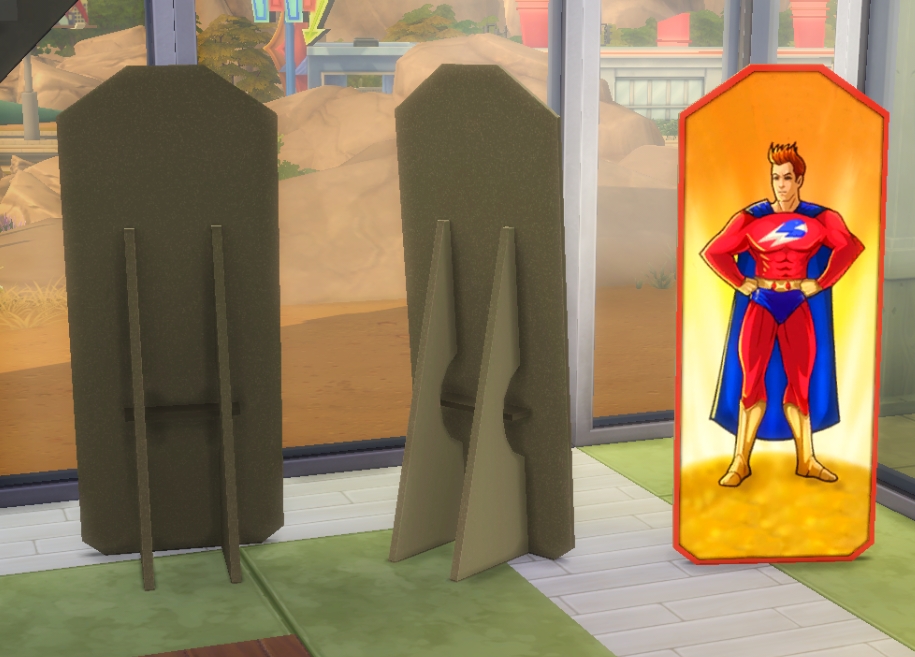
You item is now finished and saved! You can now go check it out in game.
Your finished product should look like this:


27 Comments
Hey! Great tutorial. Very easy to follow. Only thing I noticed, however, is a small step you missed when importing the textures into S4 Studio. Before you import the textures, you need to open them in a 2D editor, such as GIMP or Photohshop and export the texture as PNG or DXT1, otherwise the textures do not look right when Laptop Mode is checked in the Options panel. Thanks for the great tutorial, though.
Can you do a SIms 4 objects to Sims 3?
Does this tutorial work the same way for windows and lamps?
Is it possible to convert Sims 1 items to the Sims 4 using this method? (I want to have an automail arm for my Edward sim)
Reply to FullmetalSim
No. Sims 1 is an isometric 2.5D game, i.e. no meshes, no 3D models. You will have to create the item you want from scratch in a 3D studio and then send it to your Sims 4 game.
Can you pls show me how to set up the folders in tsr workshop?
But i wanna convert sims 4 to sims 3 🙁
Thank you so much for this tutorial,but I have problem with textures.When I want to import textures I had exported in section one,nothing shows up,actually there’s no textures,it’s just a blank .dds file.I did everything as you said but this didn’t work well.can you please help me with this?
My first try was to convert the FullWall mirror from TS3. Kinda hard to differenciate in Blender if you have two mirrors baked into each other…
Reply to Konstantin
on blender on the right it shows which is which like layers on photoshop you can delete them from there
can I convert the sims 4 expansion and stuff/game packs to the sims 3
Reply to ariana
nohu99
Excellent post. I used to be checking continuously this blog and I am impressed!
Very helpful info particularly the ultimate part 🙂 I maintain such info much.
I used to be seeking this certain information for a long time.
Thank you and best of luck.
Reply to nạp thẻ liên quân
nohu 365
I know I am too literal minded and it drives me crazy sometimes, but I don’t have Uni, so I can’t follow along with this tutorial. I was just going to convert a TS3 flamingo to TS4 just to learn, but that doesn’t work because the pedestal is too big for the flamingo and it doesn’t show up well in Blender. So how do I generally do this conversion? Just pick items of similar size, or type, or what? Thanks!
Reply to Tracy
manvip
xin chào
Reply to nạp game garena
nap vcoin
https://nap-vcoin.com
xin chào
bạn
Reply to napthe
Trang web nạp thẻ Game Bài Đổi Thưởng Online với nhiều ưu đãi khủng. nạp gamvip, nạp m88.vin, nạp 1g88.vin, nạp thẻ r88.vin, nạp thẻ nohu 365, nạp thẻ w88.vin v.v… Tặng Ngay 100% giá trị nạp thẻ duy nhất khi nạp tiền Tại Đây!
Hello, thanks you
thanks
Reply to bancahay
ZingPay.Mobi Kênh nạp thẻ chính thức VNG
Reply to zing pay
gifcode socvip
Why is there not a MAC version of TSR Workshop?
Is there a way to do this in reverse? I only play sims 3 (4 just isnt my style) but there are some sims 4 items id love to have in my game
im so frustrated. i realize this thread is super old now but please if anyone still watches this HELP MEEEE. i been at this for 12 hours. basically, it goes really smoothly until you get to the step where it says, cut 1. i got blender and originally all my sims4 cas stuff showed up. as soon as i imported both files, they disappeared. ok sure. i went back to my user preferences and addons, to checkbox them again. they are gone. i spent several hours finding the .py geo files online to add back to the library. when i FINALLY got them to show up i can’t get them activated again. note ive uninstalled and reinstalled blender several times by now, and at least 5 different versions, not limited to but including blender 2.70 2.76 2.78 2.9 and 3.1 (i found an updated version of sims tools for newer blenders but it still didnt work) i even tried some older ones than that i think. now s4 isnt opening tools in blender, (even when i went back to the scripts to get the io.py from somewhere random) and i, even though i was able to before, am unable now to even export meshes to my blender even though i have not changed the s4 studio and i do have 2.7 installed right now. sooooo…. im basically pulling my hair out at this point and almost ready to give up. i am positive its something stupid and small that i have done somewhere along the way, or not done. i got s3 tools even to show up at one point but i need s4 tools of course. pls help meee—-
edit from next day – i have finally gotten it working at least halfway. the library still is unlinked. apparently when im uninstalling blender it was only somewhat uninstalling blender. any new versions overwrite old versions, i went through and manually changed all of my versions to get uninstalls correct, which was way too many versions, and i deleted blender i had on an external drive that i had plugged in that i generally use with another computer. once i had 2.7 ONLY then i still had issues and then was able to manually enter the py from the programs86x, blender, scripts, s4 studio, .py file install, and that got one of the two packages working and showing up so in case anyone else needs it, this is a fix for errors that say in sims 4 studio ‘you need 2.7 i see you have 2.7 but are using management. click ok or cancel’, this is also a fix for: ‘there is no module name sims4studio’, module s4 studio CAS cannot be called’, s4 studio has caused an exception’, and ‘s4 studio ‘module’ has no attribute ‘register’. my program was downloaded through steam, so it goes ‘users, documents, electronic arts, the sims 4. ‘
Welcome to Sims Community!
Our community is about connecting people through open and thoughtful conversations. We want our readers to share their views and exchange ideas in a safe space.
In order to do so, we've created a simple set of rules that will improve your experience. Simply put, keep it civil.
Your post will/might be rejected if it contains:
User accounts will/might be blocked if we notice:
So, how can you be a power user?
Thanks for reading our community guidelines. Please note that we're aware of certain issues with Sign In / Log In and Create Account / Email Confirmation issues. We're working behind-the-scenes on a new Account Creation process. Thank you for your patience and remember - freedom of speech is not freedom of reach