
From time to time everyone has issues with their game. Usually caused by out of date custom content and mods when a new update is released for the game. Sometimes you can also have errors even if you do not use custom content or mods. We are going to go over a few different ways to ensure that you have a clean and healthy game, and steps you can take to understand your errors and issues in The Sims 4.
Using ‘Save As’ instead of ‘Save’
Sometimes save files can become corrupt after saving the same file over and over again. To help prevent this problem, it is good practice to use the “Save As” feature to save your game instead of using “Save” or “Save and Exit”.
What is the difference?
“Save” and “Save and Exit” will both directly overwrite the same save file over and over.
“Save As” will prompt you to create a new save with a new name, or overwrite an existing save of your choosing.
How to Backup your Saved Games
It is a good idea to occasionally create backups of your Saved Games. So that if the save file you are using becomes corrupt in the future, you still have a working backup.
The Sims 4 game cache is located in: Documents/Electronic Arts/The Sims4/ (as pictured below)

Once you have found your “Saves” folder, right click and select “copy”.
Go anywhere outside of your Sims 4 Folder (example: Desktop, Documents, etc) and right click any blank area and select paste. (as pictured below)

You now have a backup of your saves file that you can use later if needed.
Clearing your Cache in The Sims 4
Cleaning up the cache files for your game can help the performance of your game as well as fix many issues you could be experiencing. The “Cache” files are the games way of saving information about your current game. From time to time these files need to be deleted and regenerated by the game. It is best to do this quite often, especially after a new game patch or after adding/removing lots of custom content or mods.
The Sims 4 game cache is located in: Documents/Electronic Arts/The Sims4/ (as pictured below)
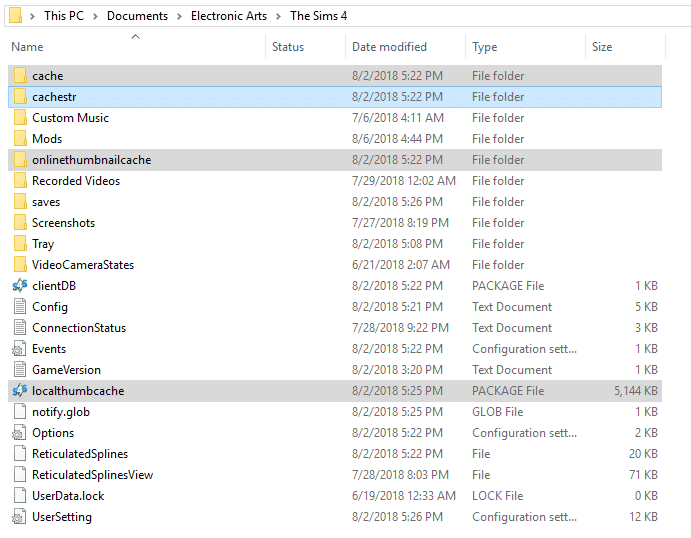
Step 1: Delete the localthumbcache.package file in the main directory in the The Sims 4 document folder.
Step 2: Open up the Cache folder, and delete all of the files that end in .cache.
Step 3: Open up the Cachestr folder, and delete all the files inside.
Step 4: If you have a folder called onlinetumbnailcache, you can delete this entire folder.
Step 5: If you have any files called “LastException” or “LastUIException” or “LastCrash” you can delete them as well.
Custom Content and Mods 101
A lot of simmers use custom content and mods to enhance their gameplay. But these items can eventually break and cause issues in your game. Sometimes even make the game completely unplayable.
First, we need to go over the difference between custom content and mods.
Custom Content is something that does not change the script/tuning of an object or item. Like clothing, hair, makeup, furniture, etc. These types of items are usually the last thing that will break and cause you issues. These “CC” items will have the .package file extension.
Mods are things that change the script/tuning of the game or of an object. These break frequently and have to be checked and updated often. Any time there is a new patch and EA changes or adds things into the game can break a mod. Which is why something you were using might be working one day and then broken after a patch. Some of these mods also contain python script files (.TS4Script File Extension) these files are NOT to be unzipped or they will not work as the mod intended. Thes “Mod” items will have at least one .package file and occasionally a .ts4script file.
How to Install Custom Content & Mods
To install custom content, download it from your favorite creator’s page. Some files when you download are in .zip or .rar format. These files have to be unpacked via programs like 7-Zip or WinRAR. Once you unzip the files, you will then see .package files. These files are how the game reads custom content.
These .package files go into your mods folder (Documents/Electronic Arts/The Sims 4/Mods). The .package files can be placed up to 5 folders deep in your Mods folder (*see next section on sorting), so you can sort these by categories any way you wish.
Mods are a little different. There are two kinds of mods (as mentioned in the previous section): Script Mods and Tuning Mods.
Tuning mods are just .package files, and can be sorted just like custom content. They will work no matter where you put them in your mods folder. Note: I recommend keeping tuning mods in their own folder, as they can break easily and have to also be updated when they do.
Script mods are at least one .package file and a .ts4script file. These mods cannot be more than one folder deep in your mods folder. (I.E. Documents/Electronic Arts/The Sims 4/Mods/Script Folder). Any files with .ts4script file extension must not be unzipped, or they will not work. These types of mods must be updated frequently (Almost every patch, depending on the mod). I recommend keeping any mods like these in their own folder. (Example: I keep MC Command Center and all of its files in one folder by itself. I.E. Any .packages and .ts4script that belong to that mod.) Any other mods that contain .ts4script files get their own individual files as well.
Keep your Mods folder sorted
One of the best ways to insure that you continue to have a healthy game is to keep your mods folder sorted. Everyone does this differently, so they can keep track of what is what. But we are going to go over how I keep my mods folder sorted.
Here is my mods folder:

As you can see I have specific items separated and named after what the contents of each folder are. Let’s go over a few of the files to explain my sorting method.
Defaults – These are anything that is default replacement items. Items that directly override game content. Such as default replacement skins, eyes, etc.
Main Mods – These are mods that I use and that have to be checked for updates frequently. I keep them in one place so I know exactly where I need to go and what I need to update after each patch.
Others CC – Here we have all of the normal custom content (not modded) that I use, which I separate by the creator. This way I can add new items, find broken items, or update an item easily. (as pictured below)

It doesn’t matter how you name or sort your files, as long as you know what is what. Just keep mods separate from custom content. It is much easier to have one or so folders for mods than to have to sort through tons of custom content to find that one broken mod later.
Rename your custom content
One of the worst things about using lots of custom content is your game loads slow and can become sluggish. Any .package file that is named using a special character or even just a space can cause the game to run and load slowly. This is because the game takes extra time to read these files with those kinds of characters. You can rename your files manually, or you can use the program Bulk Rename Utility. I personally use Bulk Rename Utility because you can edit many .package filenames at once.
Let’s go over how to use Bulk Rename Utility.
Once you open up the program, you will see a lot of information. Don’t worry we will not be changing much!
In the top left-hand corner, you will see a window where you can navigate to your files you want to rename. Once you find the folder that has the files you will see the content of the folder next to that window.
Select all of the items you wish to rename. (you can select them individually, or use Shift+Right Click to select all.) Once they are selected they will turn blue.
Next, find the box called “Remove (5)”. Only change the following items:
In the box beside “Chars” put a single space.
Next to the word “Sym.” there is a checkbox. Make sure that it is checked.
Once you have the Sym. boxed checked, and have your space in Chars. You can click “Rename” on the bottom right side of the screen. You will be prompted with a few popups saying that the program is changing files, just click “Ok”.
Once it is done, your file will be renamed! Without any spaces or special characters. Now your game will load/run faster.
Here is a gif of each step listed above of me renaming a few of my .package files:

Merging Package Files
Another great way to speed up your load times and help game performance is to merge you custom content .package files. This means you are taking multiple .package files and creating one .package file that contains all of the files you selected.
I personally do this by the creator. So I know what exactly is in the merged file.
NOTE: DO NOT merge Mod files, this will make the mods corrupt and not work most of the time. Only merge Custom Content. This means, do not merge any .ts4script files or .pacakge files that came with the .ts4script files. As this will cause the mod to break 9/10 times.
To merge .package files you will need the program Sims 4 Studio. Which is available for both PC and Mac.
Once you download and install Sims 4 Studio, open the program.
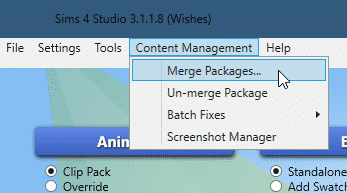
You will see “Content Management” in the navigation window. Click it, and select “Merge Packages”. (as pictured below)
A new window will pop up. You can drag and drop all of the .package files you want to merge here. Once you have all the .package files you want in the window select “merge”.
Now a window will pop up asking you to name and save your new merged .package file. Give the file a name (I name it after the creator) and click “save”.
This process can take some time depending on how many files you are merging. Just let it do its thing. Once it is complete you will get a notice saying x/x files have been merged. (as pictured below)

Batch Fixes for Custom Content
When new game patches things break. Sometimes a lot of things… But thanks to Sims 4 Studio we can fix some of these issues with our favorite custom content quickly and easily.
Are you tired of seeing random townies using custom content you didn’t assign to them? Are you having issues with objects not doing what they are intended? Then check out what you can batch fix.
NOTE: Be sure to run any batch fixes before you merge custom content. Also, even if you do not own a pack for the batch fixes (I.E. Cats and Dogs Batch Fix, etc) Do them anyway. As EA makes these changes to items for Base Game, not for the packs itself.
You can fix a lot of problems by running batch fixes frequently on newly downloaded custom content.
You can find the step by step tutorial on running a Batch Fix with Sims 4 Studio here!
Last Exception Files
What are last exception files?
Last Exception or “LE” files are .txt files Mc Command Center and other mods give you to tell you that your game has encountered an error. These can be caused by out of date mods, not updating your game, and not clearing your cache, or even caused by EA itself.
When your game generates a “LE” file you will get a notification like the one pictured below. The text on the warning will be different depending on the mods you use. But they all are telling you the same thing.

You can find the actual .txt file in your game folder. Where you can interpret the error and find out how to resolve it and/or what caused it.
- Documents > Electronic Arts > The Sims 4
The file called “LastExceptopn.txt” is your most recent last exception. If you see one named with numbers like “LastException_1234567.txt” this is an error that happened previously.
If you are having issues with your game and are receiving “Last Exception” errors but are unsure how to read them you can learn how to here or join and share your errors in the Deaderpool Discord!
Do not just ignore last exception files! This can cause you to break your save and lose it forever!


27 Comments
Great help article! I hope more simmers will see this and not be so confused whenever their game is breaking!
Great tips. Thank you!
Thanks. Very useful. I knew some of these tricks but not others.
Hi everyone, it’s my first pay a quick visit at this
web site, and post is really fruitful designed for me, keep up
posting these types of articles or reviews.
thank you. I needed this.
So it’s ok to delete the spotlight_en-us.package inside the cachestr file?
Reply to Amanda Gaskins
Yes! You can always delete everything in the cache folders, you can just delete the folders themselves. They will regenerate. 🙂
Should we also remove the characters from folders?
Running batch fix seems to have broken some of the custom content in my game. I have tattoos that just disappeared as well as skin overlays. I haven’t noticed any problems with objects just things I use in CAS. I will have to go back and re-download the cleavage overlays I had as it seems to have made most of those disappear.
You’re an amazing asset to the Simming Community. Thank you for all you do.
this is very helpful article, pls make more like this!
Thank you for this. I have played Sims since the beginning but just in the last months have started using mods and cc. It has opened a whole new Sims world to me. Thanks for your creativeness, love your meal overhaul. This senior citizen appreciates you.
Thanks. Very useful. I knew some of these tricks but not others.
Great tips. Thank you!
You’re an amazing asset to the Simming Community. Thank you for all you do.
Running batch fix seems to have broken some of the custom content in my game. I have tattoos that just disappeared as well as skin overlays. I haven’t noticed any problems with objects just things I use in CAS. I will have to go back and re-download the cleavage overlays I had as it seems to have made most of those disappear.
this is very helpful article, pls make more like this!
So it’s ok to delete the spotlight_en-us.package inside the cachestr file?
Reply to Amanda Gaskins
Yes! You can always delete everything in the cache folders, you can just delete the folders themselves. They will regenerate. 🙂
Great help article! I hope more simmers will see this and not be so confused whenever their game is breaking!
Hi everyone, it’s my first pay a quick visit at this
web site, and post is really fruitful designed for me, keep up
posting these types of articles or reviews.
Thank you for this. I have played Sims since the beginning but just in the last months have started using mods and cc. It has opened a whole new Sims world to me. Thanks for your creativeness, love your meal overhaul. This senior citizen appreciates you.
thank you. I needed this.
Should we also remove the characters from folders?
Hi I accidentally deleted the cache folder. The game seems to works but there is no new cache folder .Is the cache folder necessary in order for the game to work correctly?
Thank you so much for sharing this information! I had no idea you could rename the files – this is huge and I have you to thank!
Great tips, with the exception of the rename one. If you rename a .package file and then later need to download an update, you could easily end up with two of the same file; if you remove the space, you’ll have a harder time locating the file that you want to replace.
Welcome to Sims Community!
Our community is about connecting people through open and thoughtful conversations. We want our readers to share their views and exchange ideas in a safe space.
In order to do so, we've created a simple set of rules that will improve your experience. Simply put, keep it civil.
Your post will/might be rejected if it contains:
User accounts will/might be blocked if we notice:
So, how can you be a power user?
Thanks for reading our community guidelines. Please note that we're aware of certain issues with Sign In / Log In and Create Account / Email Confirmation issues. We're working behind-the-scenes on a new Account Creation process. Thank you for your patience and remember - freedom of speech is not freedom of reach