
Learn how to make your poses fit your Sims perfectly by making your own rigs!
Finally! A comprehensive Sims 4 custom rigs tutorial for pose creators! If you're a pose creator, you'll understand the struggle of creating a pose for your story only to have it not fit your Sims right because they have a smaller or larger body type than the default EA rigs you used in Blender. I had such a hard time finding a tutorial that was simple and easy to understand to help me import my own rigs into Blender. When someone asked me for a tutorial on this recently, I knew I needed to write one. I wanted to help other pose creators, especially new ones, make poses that fit their Sims perfectly for their stories.
Today, I'll be showing you how to import your own Sims into Blender to create your poses with. Having Sims 4 custom rigs will allow you to make poses to fit a wide variety of body shapes. The screenshots in this article are from Blender 2.7; however, you can still follow along with this tutorial if you are using Blender 3.3. I will point out any differences between 2.7 and 3.3 whenever necessary.
Table of Contents
What You Will Need
- The Sims 4 Base Game
- A (mostly) CC-free Sim you want to use as your rig
- A default EA rig (scroll down and expand the Download Sims 4 Blender Rigs section)
- The Sim Ripper
- Blender (either 2.7 or 3.3 will work fine)
- You should already know how to make custom poses for the game. This is not a tutorial on how to make poses or how to use Blender. I am only focusing on creating custom rigs for the purposes of pose creation. If you don't know how to make poses, this tutorial will be too advanced for you.
Export Your Sim
Before you start the process of making Sims 4 custom rigs at all, it's recommended that you go in-game and remove any CC on your Sim that isn't needed for the pose you're making. Some CC can cause issues with the rigs later on in Blender. This isn't always the case but the less CC, the better, just to be on the safe side.
After removing any unnecessary CC from your Sim, save and close the game and open up the Sim Ripper. This program is crucial for making Sims 4 custom rigs. At the top where it says Save Game File, locate the save game you want to export a Sim from and hit Select. Give the program a minute to load all the Sims in that save. It can take quite a while if you have a lot of Sims in that save.
Once the list of Sims loads in the left panel, use the filters in the top left to narrow down the list and help you find your Sim easier. Once you find and select your Sim, be patient. Once again, it takes the Sim Ripper some time to load all the data.
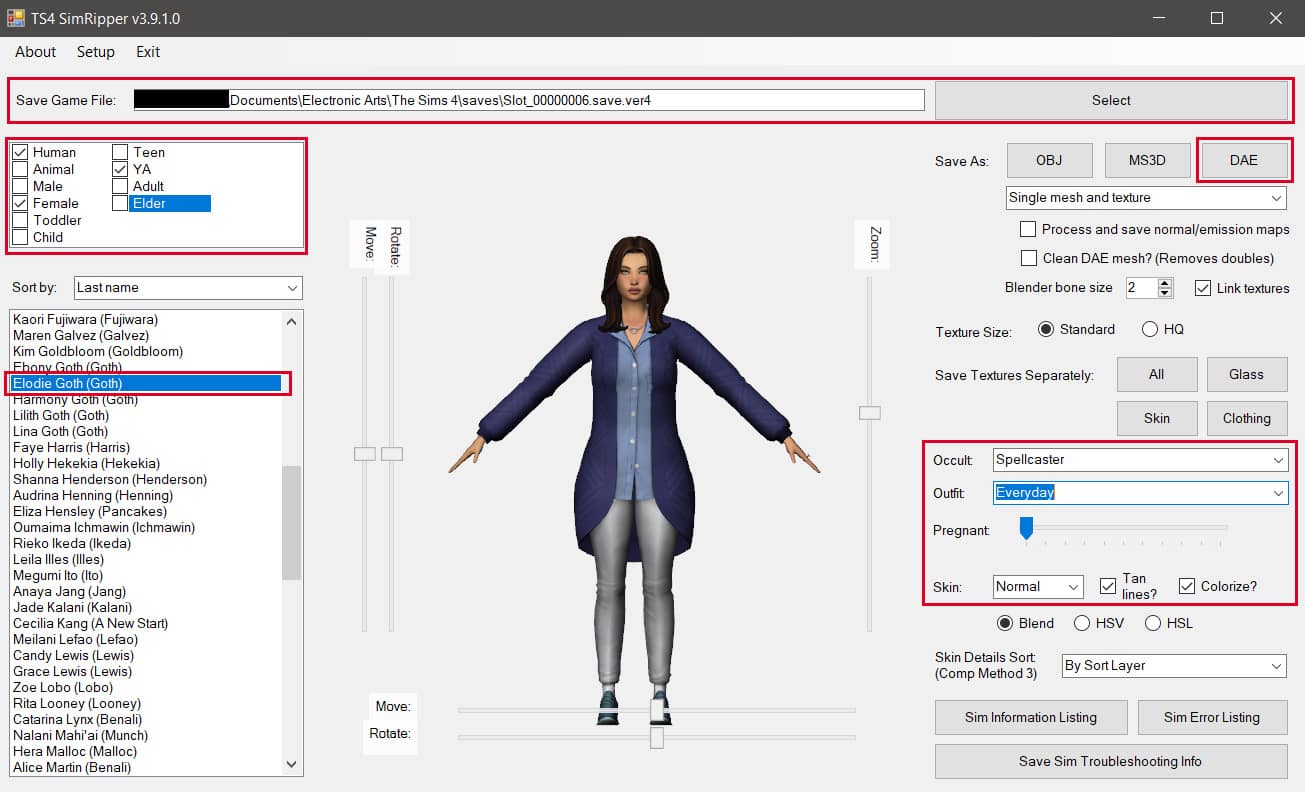
Your Sim will appear in the centre with all of their info displayed on the right. You don't need to worry about most of the stuff displayed here but there are a few settings you might be interested in. I'll walk you through them now.
- Occult: If your Sim is an occult with an alternate form, you can switch between their human and occult forms here.
- Outfit: You can select which of your Sim's outfits to export here. This is useful when making poses where the Sim is wearing something extravagant like a ballgown and you don't want limbs to clip through the skirt. You can select that outfit to work with in Blender.
- Pregnant: This is very useful for maternity poses. Simply slide the slider back and forth to the desired tummy size.
- Skin: You may not need this for pose purposes but it's worth mentioning that you can set your Sim's skin to tanned or sunburned here.
You're almost ready to create your Sims 4 custom rigs! Select whatever settings here that you think you will need for your pose. When you're ready, click the DAE button to export the Sim as a .dae file. Save it somewhere you can easily find it. If you get an error message when exporting the .dae file, try temporarily disabling your antivirus shields for a couple minutes. Mine doesn't get along with the Sim Ripper at all. Always remember to turn your shields back on right after! Antivirus protection is very important!
Create Your Custom Rig in Blender
If you haven't already, download any of the adult EA rigs from KatVerse's website. Male or female does not matter; they both use the same rig which is the only thing we'll be needing. If the Sim you just exported is a child or toddler, then download the rig for that age group. We need the frame of these rigs to create our Sims 4 custom rigs.
Open up the default rig in Blender and delete everything in the Scene panel except for the camera, lights, and the rig. You should only have the internal frame (or armature as it's called) left.


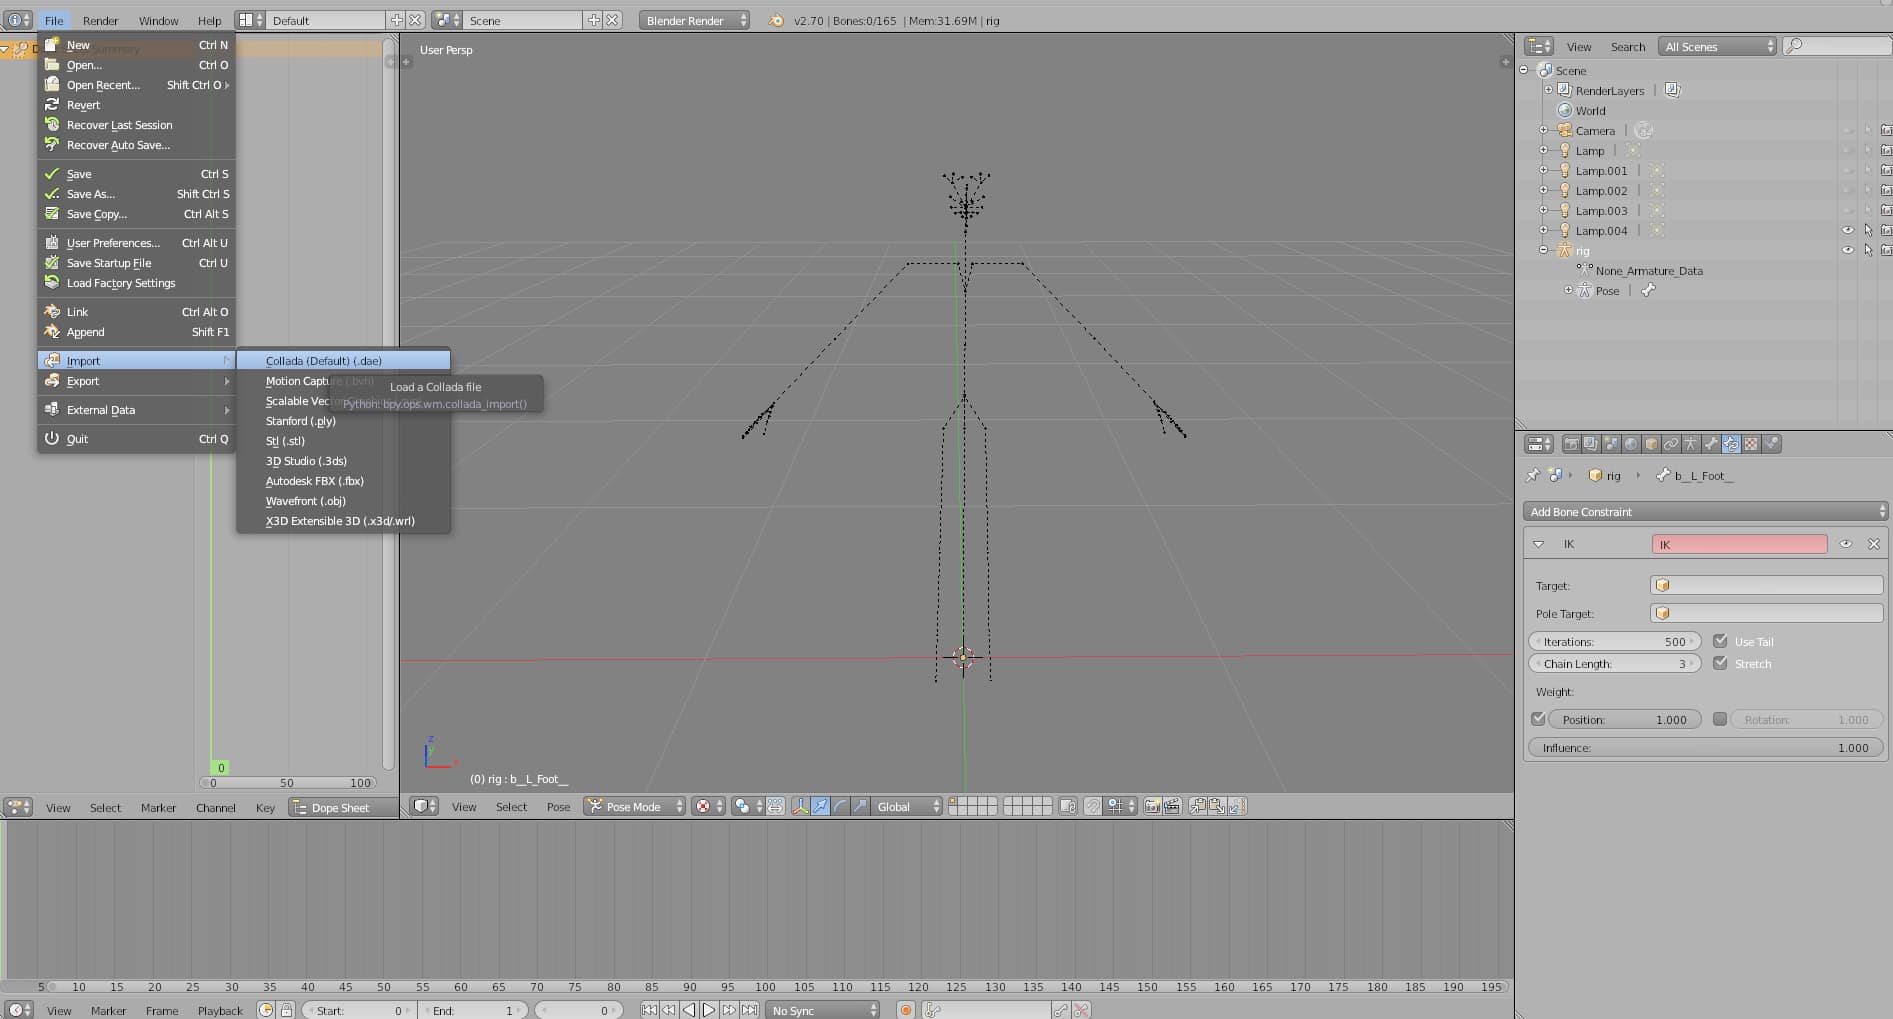
Next, go to File > Import > Collada (Default) (.dae) to import the .dae file you exported earlier. Your Sim should be directly over top of the empty frame we had just a moment ago. Believe it or not, you're already almost done making your Sims 4 custom rigs!
With the Sim now imported, delete their rig in the Scene panel. Make sure you are deleting the correct rig. You want to delete the rig attached to your Sim, not the original one we had. If you aren't sure, expand the rigs by clicking the + sign next to them. The rig with your Sim's name underneath it should be the one you delete. This is an important step. You don't want multiple armatures attached to your Sims 4 custom rigs.

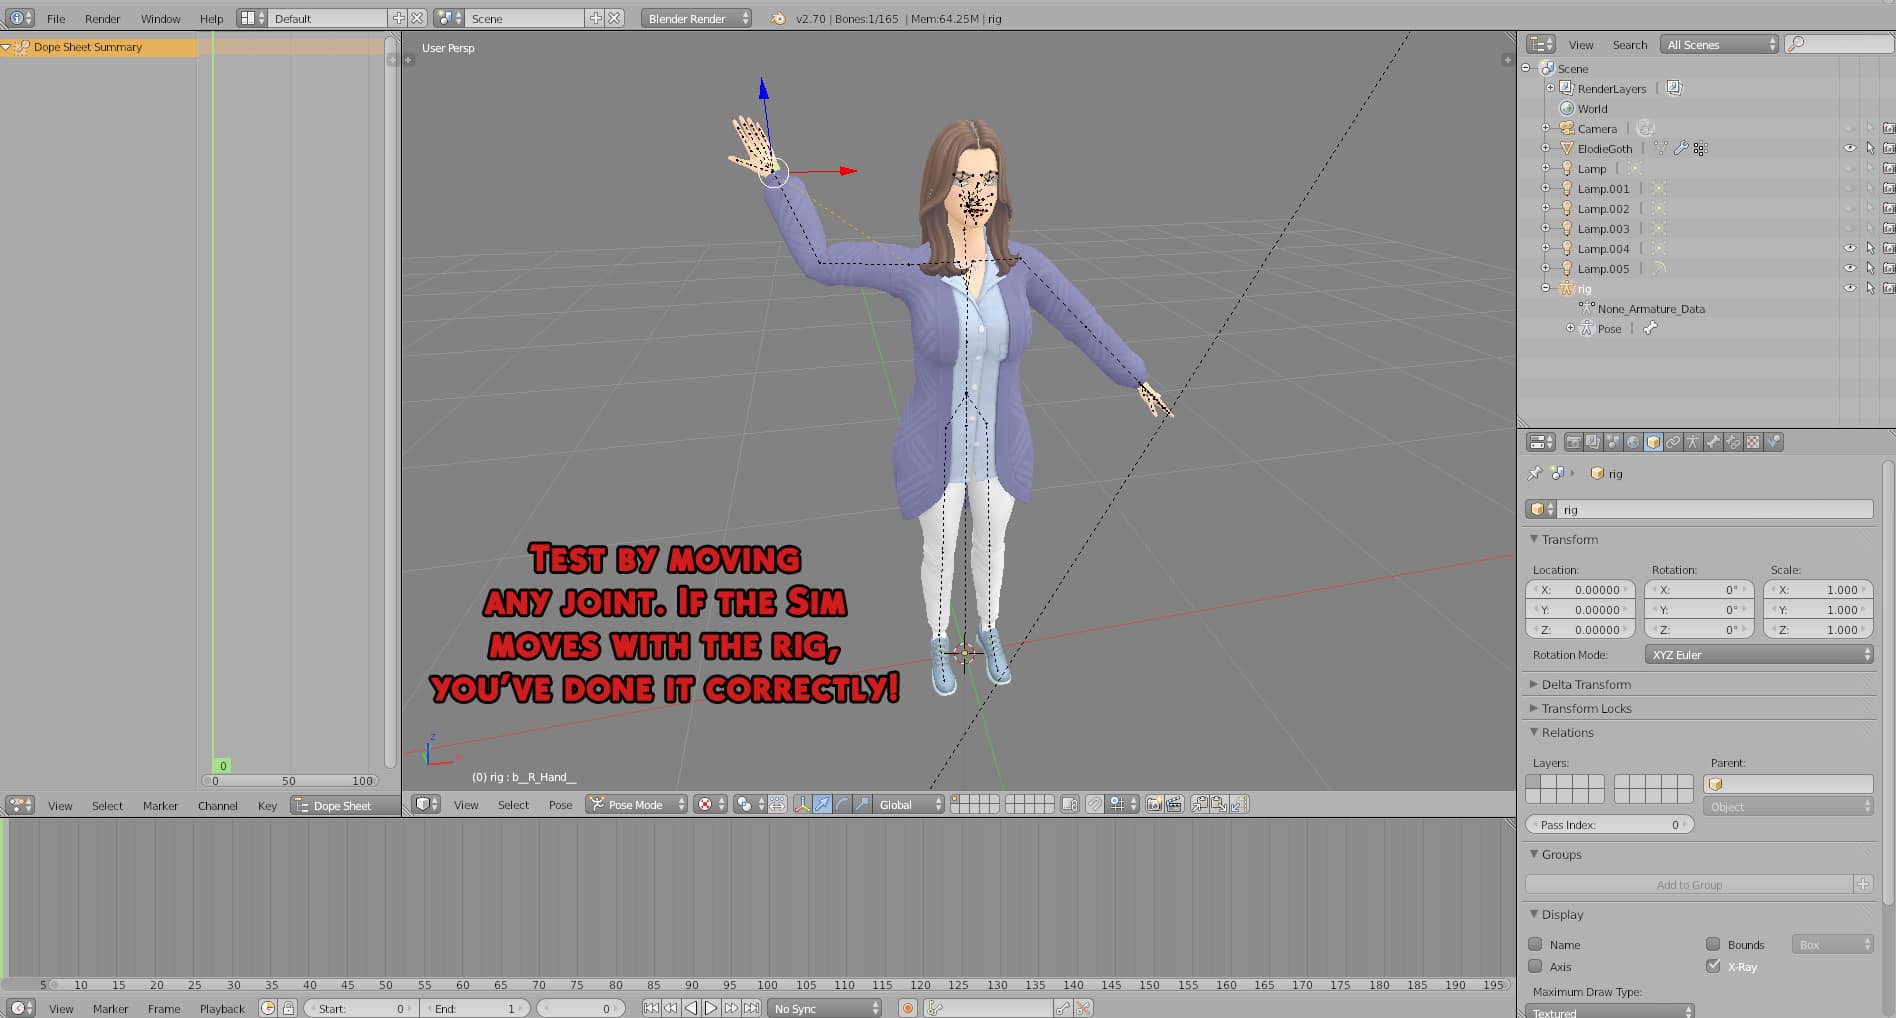
Your Sim's name should now show up in the Scene panel by itself. Select your Sim's name in the Scene panel and then select the Object Modifiers tab below the Scene panel. It's the icon of a little wrench. Under the Object Modifiers tab, select your rig from the Object dropdown menu. This will anchor your Sim to the rig so when you move the rig, the Sim moves with it. This is crucial for having functional Sims 4 custom rigs.

To test that you've done this right, move any joint on the rig. If the Sim moves with the rig, you've done this step correctly and now have functioning Sims 4 custom rigs to use for your poses!
You are basically done but there are a couple things I like to do before saving my Sims 4 custom rigs. These things just save me time later on when I'm making my poses and help me keep things organised in the Scene panel.
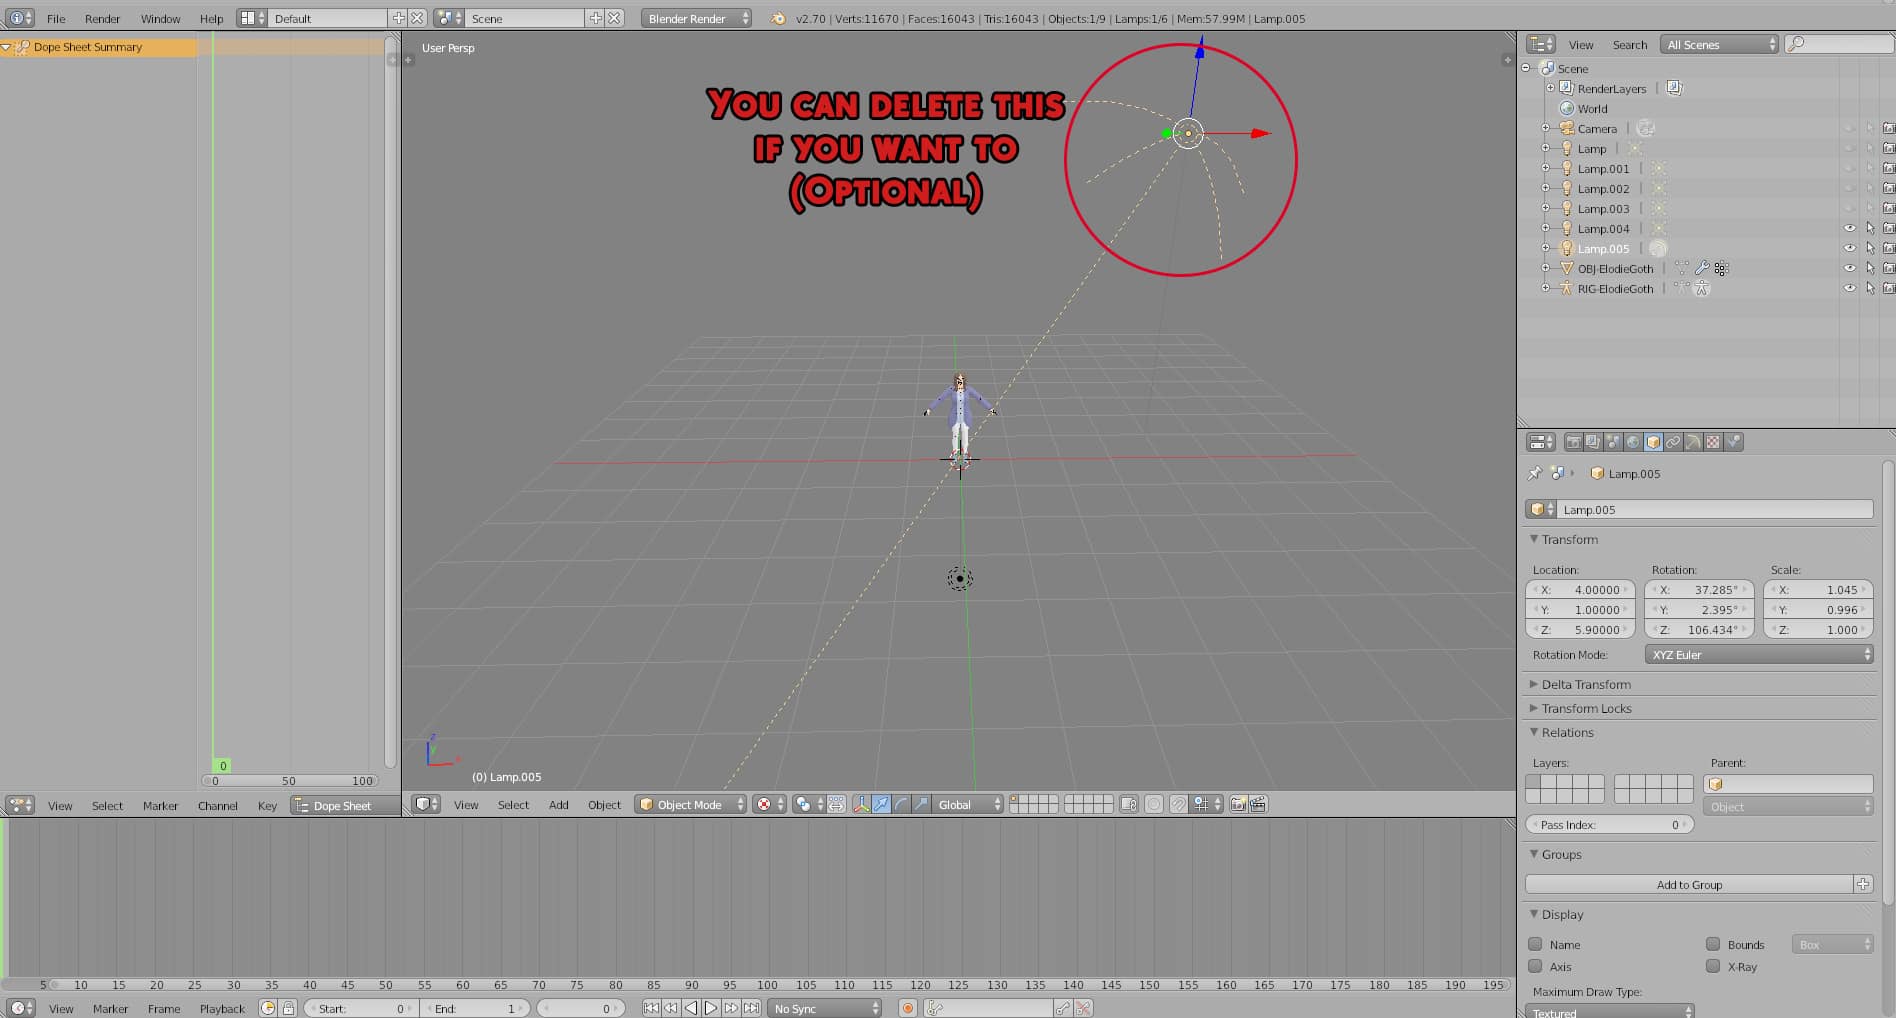
First, I like to rename my Sims 4 custom rigs and my Sims. I rename the rig to RIG-SimName and the Sim to OBJ-SimName. This helps me differentiate between the frame and the Sim when I use them for posing in the future. I also make the OBJ-SimName unselectable. You only need to move the frame when making your poses, not the Sim itself. The frame is what creates the pose. The Sim just serves as a visual guide for their body shape. If you're always accidentally moving the Sim and not the frame, that gets annoying. So make it unselectable by clicking the arrow next to it.
Blender 3.3 Tip: To make something unselectable in the Scene panel, click the funnel shaped icon in the top right corner just above the Scene panel, then choose the arrow icon. This will enable the option to make everything in the Scene panel unselectable the same way you would using Blender 2.7.

Next, I delete the fan light that gets imported with the .dae file. I just find it really annoying and in the way when using my Sims 4 custom rigs. The existing lights in the scene are a sufficient light source in my opinion. Keep it if you like it but you can delete it if you think it's annoying, too.
And there you go! You now have Sims 4 custom rigs of your own Sims to make sure that your next pose fits them perfectly! I have a folder full of Sims 4 custom rigs of all of my story characters so that I have them on-hand whenever I need to make a pose for them. I hope this tutorial helped you elevate your poses and get them perfect for every Sim, every time!
Links & Thanks
- If this tutorial was way over your head and you just want to learn how to make poses to begin with, KatVerse has an entire playlist on YouTube dedicated to the subject. Her tutorials are how I started learning to make poses, so check them out!
- If you need extra help with any general tools or features of Blender, Surfaced Studio on YouTube is my go-to when I need help navigating specific features of Blender. I recommend starting with his beginner playlist.
- Special thanks to my friend Jannel, who walked me through the process of creating Sims 4 custom rigs when I was about to pull my hair out over it. Seriously, I could not find a single tutorial that went over this exact process in a simple, easy-to-understand way. That's why I put together this tutorial; I don't want other creators to struggle making Sims 4 custom rigs like I did.
Looking for a written tutorial on how to get started making poses? We've got you covered!


0 Comments
Be the first to comment.
Welcome to Sims Community!
Our community is about connecting people through open and thoughtful conversations. We want our readers to share their views and exchange ideas in a safe space.
In order to do so, we've created a simple set of rules that will improve your experience. Simply put, keep it civil.
Your post will/might be rejected if it contains:
User accounts will/might be blocked if we notice:
So, how can you be a power user?
Thanks for reading our community guidelines. Please note that we're aware of certain issues with Sign In / Log In and Create Account / Email Confirmation issues. We're working behind-the-scenes on a new Account Creation process. Thank you for your patience and remember - freedom of speech is not freedom of reach