Bring your unique vision to life by making your own custom poses!
Have you ever wanted to learn how to make your own custom poses for The Sims 4? Today, I’m going to show you how to make a simple pose for a single Sim. Making single Sim poses is a good way to get started before you start tackling more complicated poses with multiple Sims. This tutorial should be relatively easy for a beginner to follow but I still recommend taking some time to familiarize yourself with the basic controls of all the programs we’ll be using, first.
What You Will Need
- The Sims 4
- Blender
- The Sims 4 Studio (You need to make a free account to download)
- Any image editing program. I’ll be using Photoshop CS6 but Paint.NET is a good free alternative.
- An adult EA rig (Scroll down to Download Sims 4 Blender Rigs)
- Pose Player
- Sim Teleporter
Basic Controls
I’m going to give a brief rundown of some of the more common Blender controls you’ll be using but this isn’t an exhaustive list of tools by any means. It’s just enough to let you follow along with the tutorial.
HotKeys
- A – Select/deselect all points
- CTRL+4/6/2/8 (Numpad) – Pan left, right, down, and up
- Hold Scroll Wheel + Move Mouse – Rotate the view angle freely
- Right Click – Select a single point
- SHIFT+ Right Click – Select multiple points
- Right Click + Drag – Freely move a point in any direction
- Right Click + G – Allows you to freely move a point just by moving the mouse. Ideal for facial expressions.
- CTRL+Z – Undoes the last action. Can be used again and again to undo the last several actions.
Tools

- Move – Moves the selected points along a horizontal or vertical axis
- Rotate – Rotates the selected points
- Pivot Centre – You will pretty much always be using either Median Point or Individual Origins. For the purpose of this tutorial, always have the pivot centre set to Median Point unless I instruct you to switch to Individual Origins.
- Object Interaction Mode – Always make sure this is set to Pose Mode. The only time you’d use Object Mode while making poses is when saving group poses. We won’t be going over that in this tutorial.
If all that looks like mumbo jumbo to you, don’t worry! It will begin to make more sense as you go through the rest of the tutorial. Just keep these hotkeys and tools in mind and refer back to them whenever you need to.
Posing the Body

Open up your EA rig you downloaded in Blender. We’ll be using an adult female rig but you can use an adult male rig if you like. There’s not much difference between the two.
Now it’s all up to you and how you want to pose your Sim. I’m going to make this Sim jumping in the air excitedly waving both arms. You can pose your Sim however you like but I recommend something simple to start with. To pose your Sim, you will be selecting different points on the rig (the dots connecting the dashed lines) and either using the Move or Rotate tools to move them to the position you want. Generally speaking, you’ll be using the Rotate tool much more often than the Move tool. The Move tool is good for moving the entire rig up, down, or side to side. The Rotate tool is what will move the individual limbs.
To rotate a point, select the point with the Rotate tool selected. Then click on the blue, red, or green circles to rotate it in that direction. To move a point, select the point with the Move tool selected and drag it along the red, blue, or green lines.
To move the entire rig, make sure all points are selected by hitting A twice before you use the Move tool. To rotate the entire rig, do the same before you use the Rotate tool but make sure your Pivot Point is still set to Median Point. If the Pivot Point is set to Individual Origins, you’ll end up with a contorted, scary looking pretzel Sim.
To freely move a point in any direction outside of the rotation wheel or horizontal/vertical axis, you can select it and then drag it in any direction. This can be useful sometimes but more of a pain than anything else at other times. Still, feel free to play around with it and find what’s easiest for you.

Spend some time playing around with the different points and moving them in different ways (even strange ways that look wonky). You can always hit CTRL+Z to undo a mistake so don’t worry about messing things up. Just explore how the different body parts move and get a feel for rotating limbs in different ways. The more you do this, the more you’ll begin to understand how to move the joints in a way that looks realistic. It’s just time, practice, and experience. You can also look at reference pictures online and study how each individual muscle moves to create that position. You’ll find that even a simple wave utilizes much more than just the arm muscles. In fact, the entire body shifts to make such a movement. You’ll need to practice how to replicate this in Blender by rotating multiple parts of the body.
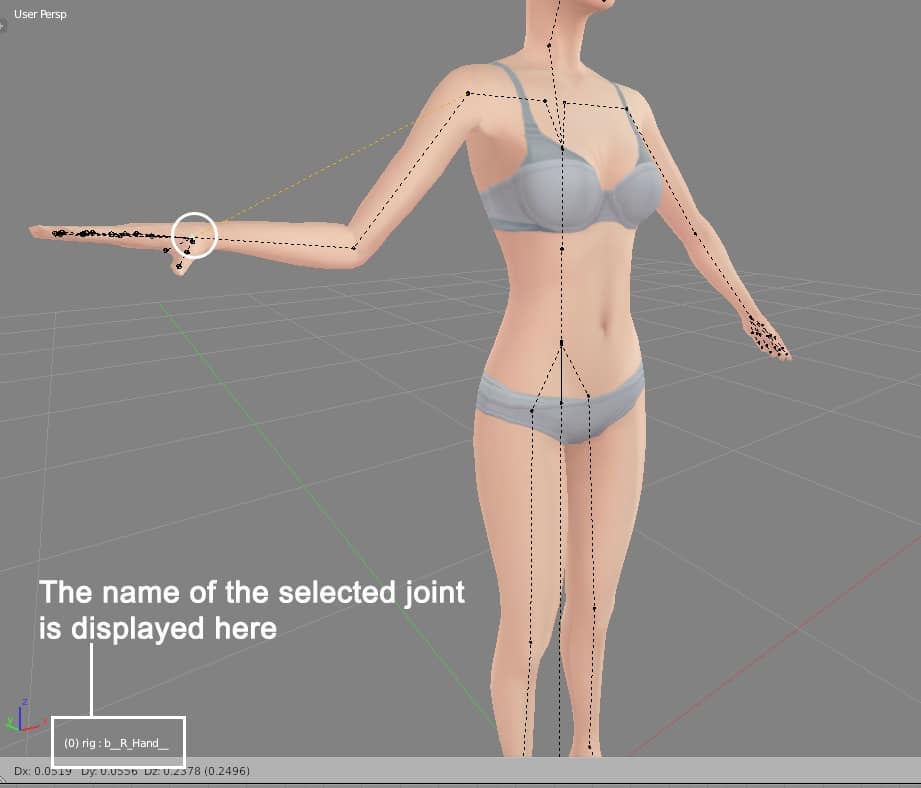
You’ll notice as you select different points, you’ll see the name of it in the bottom left corner of the view screen. This is a good way to tell which part of the body you have selected, especially when you’re selecting points in a tight area with a lot of other points nearby, like the hands or head.

To create my pose, I selected all points, then used the Move tool to raise the Sim slightly in the air. Then I used the Rotate tool wherever I wanted to rotate a limb until I had my Sim in the position that I wanted. Notice how I’ve made many adjustments to different parts of the body, not just the arms and legs. The Sim is leaning back slightly. I did this by rotating the spine points. She also has her shoulders raised. I did this by rotating the clavicle points. Her body leans to one side slightly and her head is tilted a bit, too. All of these smaller micro-adjustments are what will make your pose look lifelike and not stiff or robotic.
Creating the Facial Expression

Chances are, you’ll want your Sim to have some kind of expression on their face so they don’t look like an emotionless robot. The good news is facial expressions are (mostly) much more simple than posing the rest of the body. This is because a lot of it can be done by freely moving the face points with Right Click + G.
The best areas to use the G shortcut are the lips, eyebrows, and the squint points (located on each cheek). Select the point by right clicking, then hit G to freely move it any way you want just by moving your mouse around. You can make your Sim look happy, sad, angry, surprised, scared, etc, just by moving the lips, squint points, and eyebrows.
But what if you want to open your Sim’s mouth or close their eyes or have them looking in a different direction? You can do all of that, too, just with some different tools.

To open your Sim’s mouth, find the jaw point located in the back of the head and use the Rotate tool to rotate it to an open position.

To open or close the eyelids, first make sure your pivot point is set to Individual Origins. Then search for “lid” in the scene panel, as shown in the image below. Select b_L_UpLid and b_R_UpLid (left and right upper lids) simultaneously by holding SHIFT while right-clicking. Then move your mouse curser back to the view panel (where your Sim is) and press R twice. Then just drag the eyelids down to close the eyes and left-click to confirm. To make a Sim wink, do the same thing with just one eyelid selected.
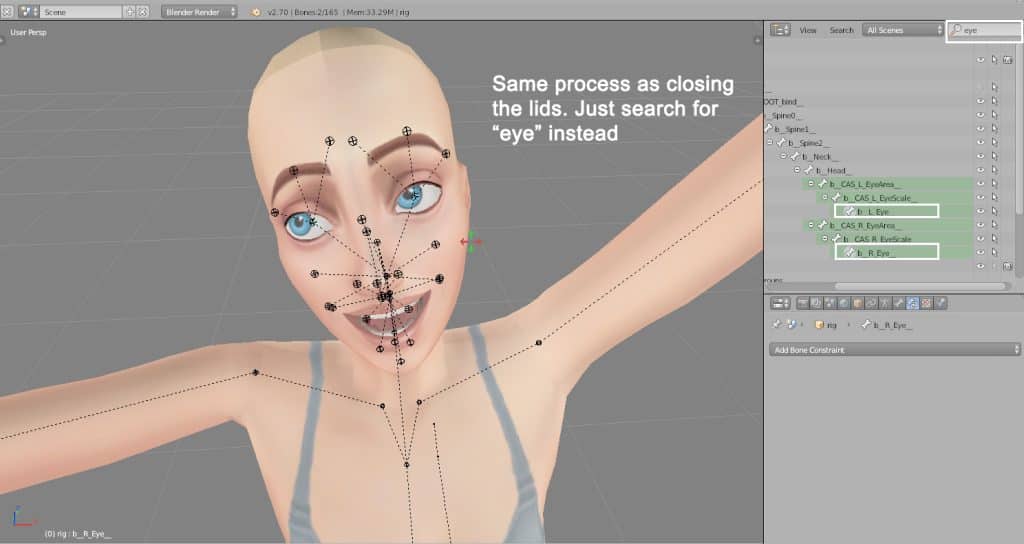
To change the direction of the eyeballs, first make sure your pivot point is set to Individual Origins. Then search for “eye” in the scene panel. Select b_L_Eye and b_R_Eye (left and right eyes) simultaneously by holding SHIFT while right-clicking. Then move your mouse curser back to the view panel and press R twice. Then just drag the eyes to whatever position you want and left-click to confirm.
Finalizing Your Pose
When you’re satisfied with the pose you’ve created, hit A twice to select all points, then hit I (not L) and select LocRot. This will lock all the joints in place. You should see a long list of joint names highlighted in green show up in the left hand panel when you do this. If nothing shows up or if only a few joint names show up, you did not lock the joints correctly. Try again by making sure all points are selected before you LocRot the joints.
After locking in the joint rotations, save it as a .blend file anywhere you can easily find it on your computer. Then close Blender and open up Sims 4 Studio.

Enter your creator name and choose Animation > Clip Pack. Name the .package file something easily recognisable and save it to your Mods folder. Once you’ve named and saved the .package file, the clip pack screen will open up for you to edit. In the Pose Pack tab, enter the name and description of your pose pack in the provided fields. I’m working on a waving pose pack so I put in those details.

Switch to the Clips tab and hit Import at the bottom. Find the pose you just made and import that. The name should change from Blank Clip to whatever you named your .blend file when you saved it. Then hit Save! It’s time to test your pose!
Close Sims 4 Studio and open up The Sims 4. I will assume you already know how to use poses if you are learning how to create your own so I won’t go over how to use Pose Player or the Teleporter here. Teleport a Sim where you want them to pose and find your pose pack you just created in Pose Player.
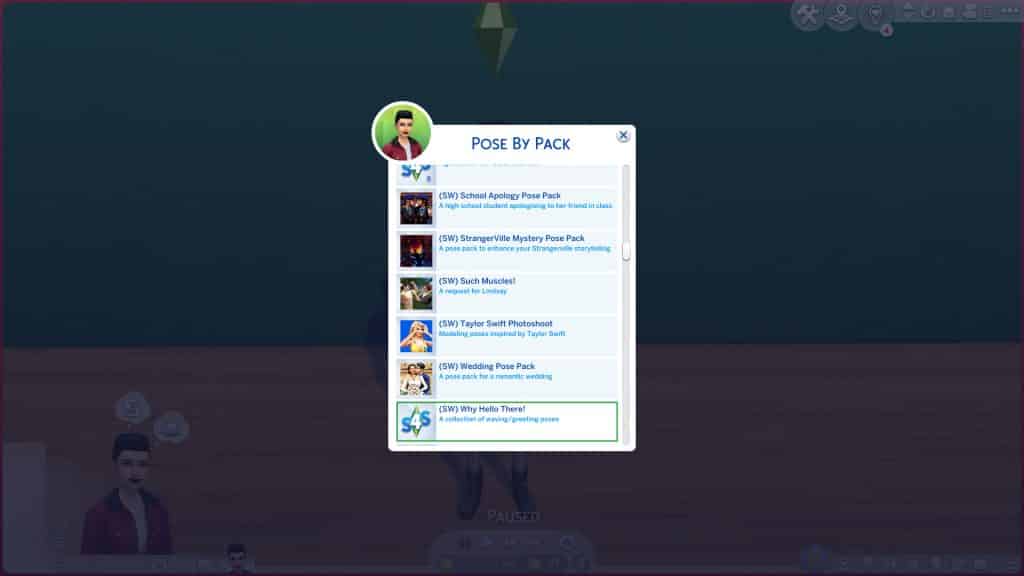
If your Sim does the pose properly, congratulations! You made your first custom pose! Make sure to take a screenshot for the thumbnail. If the Sim did not pose correctly, open your .blend file again and make sure you locked all the joints correctly and that you were in Pose Mode when you made the pose.
The Finishing Touch
All that’s left to do is create the thumbnail! To do that, open up the picture you took in-game of your pose and open it in any photo editor you like. I’m using Photoshop CS6 but whatever you want to use is fine as long as it can crop and resize images.

Pose thumbnails must be 64×64 pixels and a .png image file. Crop your screenshot with a 1:1 ratio (a perfect square), then resize it to 64×64 pixels. I also recommend sharpening the image a little before saving. Save it and open up your pose pack again in Sims 4 Studio.
On the Clips tab, hit Import next to the blank thumbnail and select your thumbnail you just saved. If you have multiple poses in your pose pack, you’ll need to make individual thumbnails for each of them and import them into each clip.
When you are finished adding thumbnails to your individual poses, pick your favourite thumbnail out of the bunch and import it on the Pose Pack tab. This is the thumbnail for the entire pose pack that people will see when scrolling through their list of pose packs.
More Resources
If you’re more of a visual learner and don’t follow written tutorials well, Katverse has a whole range of pose tutorials on her YouTube channel. She is the Queen of Poses and I actually learned how to make poses by watching her tutorials! She will also teach you how to make poses with more than one Sim, poses with objects and accessories and all kinds of neat tricks to help make posing easier for you. So check out her full playlist on her website!
[mks_button size=”medium” title=”KatVerse Pose Tutorials” style=”rounded” url=”https://katverse.com/tag/how-to-create-poses/” target=”_blank” bg_color=”#4aa500″ txt_color=”#FFFFFF” icon=”fa-arrow-down” icon_type=”fa” nofollow=”0″]







I’m only try for one hour. I got it!!!!!
Dear lord, I’m so glad, Oh Ty!!!
<3 <3 you created a monster 3:D
So happy my tutorial helped you!