

Hello everyone,
I have been asked many times to create a tutorial on how I make my recolors. I will be showing you two different and simple ways to create a recolor. We will go over clothing recoloring in this tutorial, but you may use the same methods for object recolors as well.
I will not be explaining how to export the .DDS images you will need to create your recolor in this tutorial.
If you have any questions, feel free to ask in the SC Social thread.
For this tutorial you are going to need the following programs:
- Sims 4 Studio(*Registration Required)
- Photoshop, Paint.net, or Gimp
- Photoshop DDS Plugin
For this tutorial I will be using Photoshop CC, but you can use any art program as long as you can create layers, alter opacity, and edit with hue/saturation.
Be sure to download and install these programs, if you have any questions on installing please ask.
In this section I will be showing you how to create a clothing recolor using the Hue/Saturation method. This is one of the most common ways to create a recolor.So, let’s get started.

1. This method is very simple. First open the .DDS image you would like to recolor.
2. For Photoshop users, you can find the Hue/Saturation adjustment on the right side of your screen under the Adjustment tab.
If you do not have it available on your screen you can also go up to: Image > Adjustments > Hue/Saturation
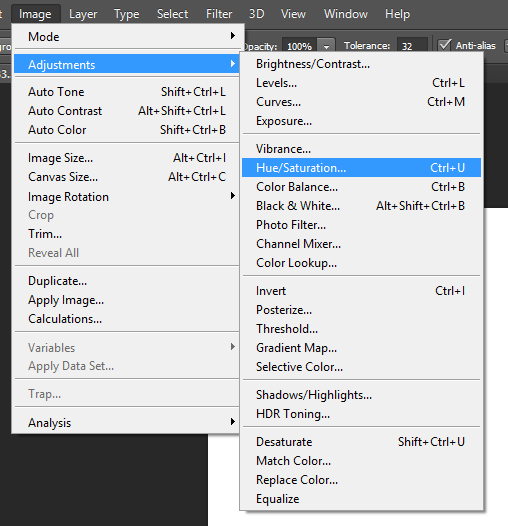
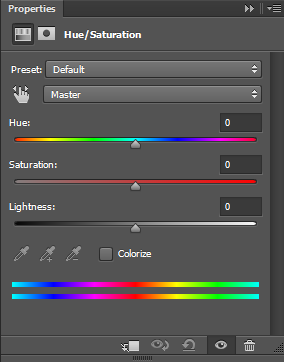
3. Now a window called Hue/Saturation will open.
There are 3 bars as pictured below.
~ Hue– Color or Shade
~ Saturation – Measures the degree to which a color differs from gray
~ Lightness – How dark or light the image appears.
4. Next, simply move the sliders for Hue to achieve the color you are wanting.
Then, change the saturation to change how vibrant the color is.
Finally, change the lightness to adjust the shadows and highlights of the item.

In this section I will be showing you how to create a clothing recolor using my own method. This is the way I create all of my recolors for all of my work. I use this method instead of the Hue/Saturation method because it eliminates any pixelation in the image.So, let’s get started.

1. First, create a new layer. Using the Spill bucket  spill black on the image.
spill black on the image.Next, go up to the filters and select Color. This will turn the image into black/white.
(Even if your image is already black and white, do not skip this step.)

2. First, next to your layers tab, select Channels.
Then, go down to the bottom and click the box next to Alpha 1. This will cause the white background of the image to turn red.
Next, uncheck the box next to the RGB channel. This will deselect the image and leave you with a black and white image (Alpha).
3. Hold Shift + Right Click the ‘Alpha 1’ image. This will select the alpha as pictured below.

4. After your alpha is selected, check the box next to the RGB channel. This will allow you to see the texture again.
5. Next, create a new layer.
Once again, using the spill bucket spill black on the layer.
Go up to Opacity and change it to 85%. I usually use 85% but you can go anywhere between 70%-85% as long as you can see the details of the original texture. Now you have a black recolor of the item as pictured below.

5. Next, create a new layer.
6. Choose a color and use the spill bucket to cover the image.
Change the filter to Linear Light as pictured below.
Now you have a recolor! Repeat step 6 for all colors you would like.

To get different shades, play with colors!
How I achieve different vibrant shades:
Use the spill bucket with grey/white set to liner light and change the opacity to 21%.
Create a new layer, and now you can spill your color(s) you desire.


6 Comments
Thankyou or the tutorial 🙂
can you do an updated version of this?
I don’t have PhotoShop so DDS files will not work… anything else I can do?
Reply to LunaEclipse1177
Wait, never mind, I’m sorry I just read that Gimp will work.
Dows ti have to be a DDS file? Because Gimp does not work with them.
How do i know what the DDS files are? You don’t really say how to find those.
Welcome to Sims Community!
Our community is about connecting people through open and thoughtful conversations. We want our readers to share their views and exchange ideas in a safe space.
In order to do so, we've created a simple set of rules that will improve your experience. Simply put, keep it civil.
Your post will/might be rejected if it contains:
User accounts will/might be blocked if we notice:
So, how can you be a power user?
Thanks for reading our community guidelines. Please note that we're aware of certain issues with Sign In / Log In and Create Account / Email Confirmation issues. We're working behind-the-scenes on a new Account Creation process. Thank you for your patience and remember - freedom of speech is not freedom of reach