
Object Recoloring
Hey guys! Today I wanted to talk to you about how I do object recoloring. I taught myself how to recolor so I may not do it the easiest way or the way others do it but it makes sense to me. Hopefully, it will make sense to you as well! Recoloring objects is invaluable in a game that lacks a color wheel and with objects that rarely match or are oddly colored. What is up with the white objects in this game? The first thing you are probably going to want to do is remove the dingy color off all that whites, right? I’ll show you how to make your whites brighter.
But first, a little detour into the ethics of custom content creating. The most important thing is respecting the wishes of the original creators. If their rules say “do not recolor” (even if it’s ridiculous to put this on an EA object) or if it says “do not share or alter my meshes” then you CANNOT SHARE IT! Period. End of discussion. Don’t be a stealing jerk. The second most important rule is TEST YOUR STUFF! How many times have you downloaded something because it was too cute for words and then put it in your game to discover it’s broken? Exactly. That’s because the creator couldn’t be bothered to actually play test the item…or they don’t even own the game. Don’t be that person. Work hard at becoming the kind of CC or Mods maker that people can trust because they know you release quality and well tested items.
Lecture over.
Back to the tutorial.
Tools needed:
- Graphic editing program (photoshop, paintshop, gimp, etc)
- Gimp + DDS plugin
- Sims 4 Studio (S4S)
Step 1
Create a folder on your computer where you will be keeping all your custom content. Your top folder should be something like “Sims 4 Custom Content” and then inside that you will store your goodies. Stuff like the fabric swatches, art work, palettes, etc that you might want to use for your CC should have it’s own folder. Then you will have a folder for your CC WIP and one for when you complete you CC. This is a sampling of some of my folders; as an example:
Sims 4 Custom Content
–Fabrics
–Palettes
–Artwork
–CC Wip
——Name of CC I’m making
–Completed CC
Step 2
Go shopping! Search for fabrics (I recommend colour lovers for patterns), artwork, palettes. A quick word on artwork, be mindful of the copyrights. I have seen Disney shut people down for using their images. You don’t want to be hit with a copyright infringement over some free CC you are making. Once you have gathered things you like and organized them into their own folder, then you can start the process of doing your first object recolor. This is what a palette looks like, I suggest making yourself a big grid and then filling in each box with colors you like so you can make your own unique color palette.

Step 3
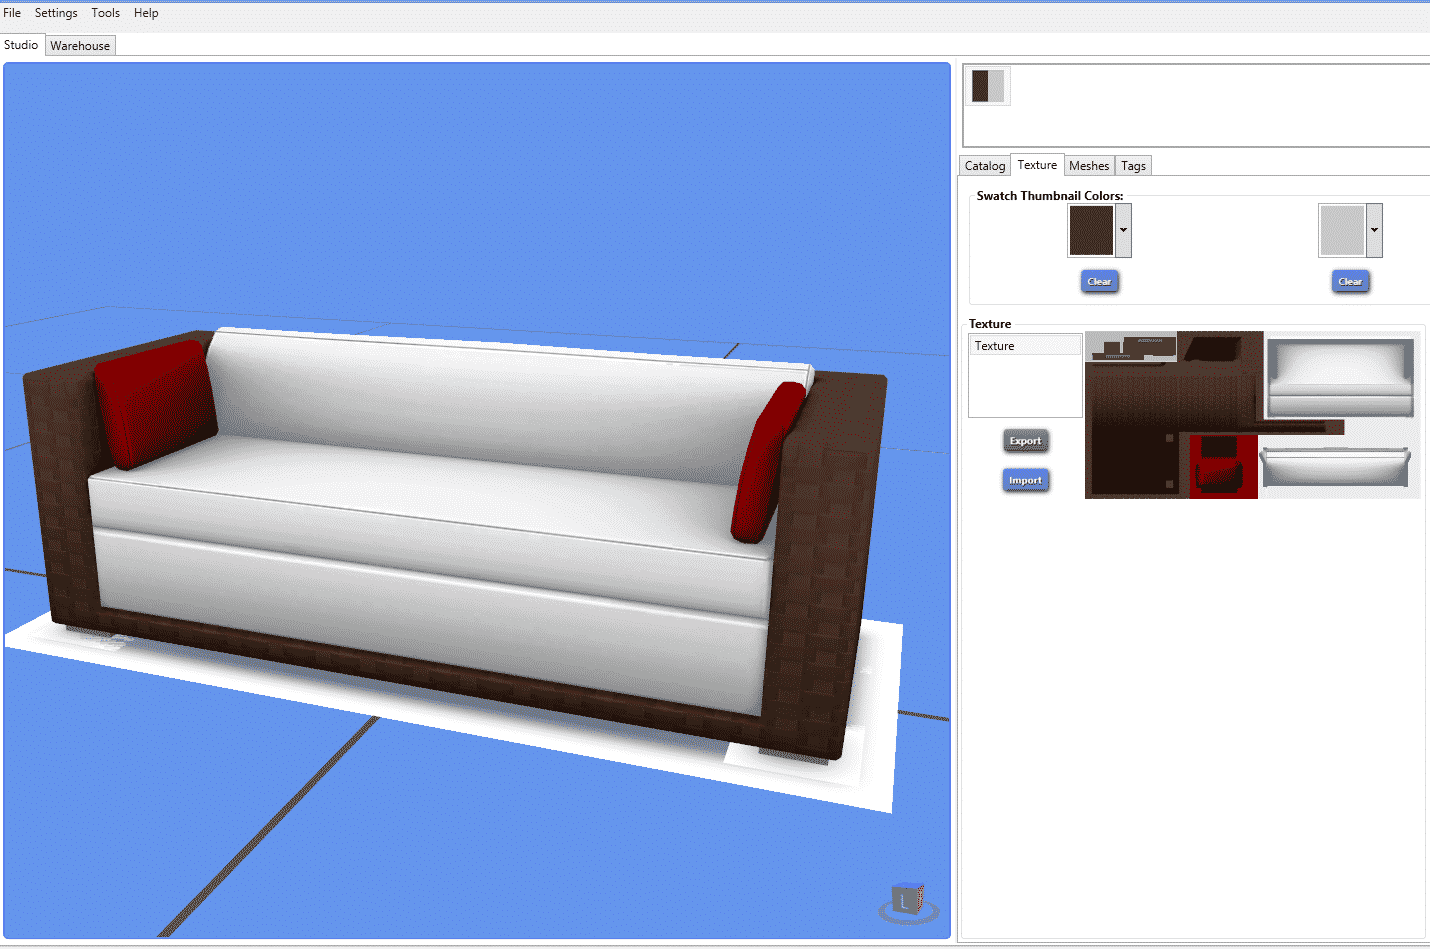
Now that you’ve got all the prep work out of the way, you can start the recoloring process. Launch S4S and then choose “standalone recolor” found under the “object” button. We will be recoloring a love seat, so I’m going to type loveseat into the search bar at the top. If you know exactly what you want to recolor, type the name in or you can type in the number of the pack to find things faster. The Grand Wickish Pizzazz looks like a good choice, let’s do that one. Select it by clicking on it and then choosing next at the bottom of the screen. Once it is done cloning, name your package.
As you can see, every single color option for that item shows up. What I want to do is give myself more of the light wicker color options since it’s my favorite. So, I will be exporting a couple of the textures. Under the studio tab, click on the texture tab and then choose the texture you want to export. I’m going to export the 4th and the 7th ones.


Step 4
After extracting the .dds texture, you are going to open Gimp and convert that into a .png image so you can edit it in your graphic program. I am assuming that you do not have Photoshop CS and the DDS plugin installed; if you do then skip this step. Begin by opening the image in Gimp, select OK when it asks you if you want to load DDS. Under the file drop down menu, you are going to select “export as”. Go down to where it says “select file type (by extension)” and then scroll down till you find .png. Select export and make sure you change the compression level to zero. Leaving it at 9 will make your image grainy looking. Click on export in the popup menu.


Step 5
Load the images you just converted into your graphics program and also load any palettes you made that you want to use for this item. I like to work in layers, so the first thing I will do is make layers of the items in the image. I made a layer of just the brown wicker part of the love seat. I will also make a layer of just the pillow part because I want a solid colored pillow. I made the layers separate images just so I could show you guys what I’m doing. They are actually just placed on top of the main image when doing this.


I want to make the wicker a darker color, so I will use the eyedropper tool and choose one of my palette colors. Next select the color changer tool and select the layer that has the wicker, this is the color I want to change. As you can see, the wicker is now a dark brown. Do this for the other layers changing the colors to whatever you want.


Step 6
Once you are done changing the colors of your layers, save your texture and then go back to your package in S4S and select the texture tab. This time you will be choosing import. A popup will appear and you select the image you want. Then select the open button. To add more images, click the add swatch on the top right corner. You can also delete images by highlighting it and then clicking the remove swatch button. The more swatches you add, the larger the file becomes. So, try to keep them between 10 – 15. At this point, you can either change the textures or delete them. I deleted them for this tutorial.
Step 7
Save your package and then test it out in you game. Please be sure to test your custom content in live mode so you can correct any problems.
Congratulations! You just did your first recolor. This method can be used on CAS items as well. Feel free to reach out to me at the Sims Community Social if you have any questions.


5 Comments
How do you make a layer out of a selection? When I tried to do it, I clicked create layer via copy. However, when I did a color fill layer, it colored all of the layers below it rather than just a specific layer. I’d appreciate some help!
Reply to Noa
You have to right-click on your selection, then select Layers via Cut
Hi Tatiana – I know this is an old article but I’m hoping you’ll see this. How did you get your pillow to be free of pattern? I’ve been looking everywhere for an answer and can’t figure it out. Your help would be appreciated!
I know this is extremely old so yoou might not even do this stuff anymore, but if you do, I was wondering if you could make an updated version of this tutorial? Gimp now looks quite a bit different and I am… quite confused by step 5 and cannot get past it.
God. I love you for making this tutorial, thanks a lot!!
Welcome to Sims Community!
Our community is about connecting people through open and thoughtful conversations. We want our readers to share their views and exchange ideas in a safe space.
In order to do so, we've created a simple set of rules that will improve your experience. Simply put, keep it civil.
Your post will/might be rejected if it contains:
User accounts will/might be blocked if we notice:
So, how can you be a power user?
Thanks for reading our community guidelines. Please note that we're aware of certain issues with Sign In / Log In and Create Account / Email Confirmation issues. We're working behind-the-scenes on a new Account Creation process. Thank you for your patience and remember - freedom of speech is not freedom of reach