
Guide to Roof Styles with 29 different Examples!
In some ways, roofing is the easiest it’s ever been in The Sims 4. In other ways… it’s not. For example, we have the ability to copy roof pieces, adjust the eaves, and we have many more advanced methods of controlling the curvature of roofs. On the other hand, we don’t have an auto-roof tool like we did in previous Sims games which can make it difficult for a newbie builder to roof their buildings.
We’re going to give you a rundown of all the different roof pieces and show you 29 different examples of roofs you can create for many different shapes of buildings. We’re also going to show you a few advanced tricks and shortcuts to maximize roof customization.
Default Roof Types

In order to understand how to create elaborate roofs with many different pieces, you’ll first need to be familiar with the default roof pieces. There are a total of 12 different styles of default roofs, numbered above:
- Gabled
- Hipped
- Half-Gabled
- Hexagonal
- Octagonal
- Pentagonal
- Half-Hipped
- Circular
- Hipped Diagonal
- Half-Hipped Diagonal
- Half-Gabled Diagonal
- Gabled Diagonal
We’ll be using the above terminology when describing which pieces you’ll need to use when designing the different example roofs so refer back here if you’re unsure of which piece we’re using.
Of course, all of these pieces can be manipulated in a number of ways. We can curve the different roof pieces to create domes or wavy roof styles. We can pull out or bring in the eaves overhanging the sides of the roof. We can adjust the pitch of the roof but it’s best to see these tools in action in order to learn about them so we’ll go over ow to manipulate each piece in the example roof styles below.
A-Frame


A-frame homes are popular as lake houses and modern cabins. To create an A-frame home, you’ll need a square or rectangular room, a gabled roof piece, and two half-gabled roof pieces.
Place the gabled piece on top of the room and use the arrows to stretch it out to the same length and width as the room beneath it. Then place a half-gabled piece on one side and use the arrows to adjust the pitch of both pieces until they both have the same pitch, creating a seamless edge from the ground to the top. Highlight the half-gabled piece and select the copy icon to make a copy of it and place it on the other side.
Barrel-Vaulted

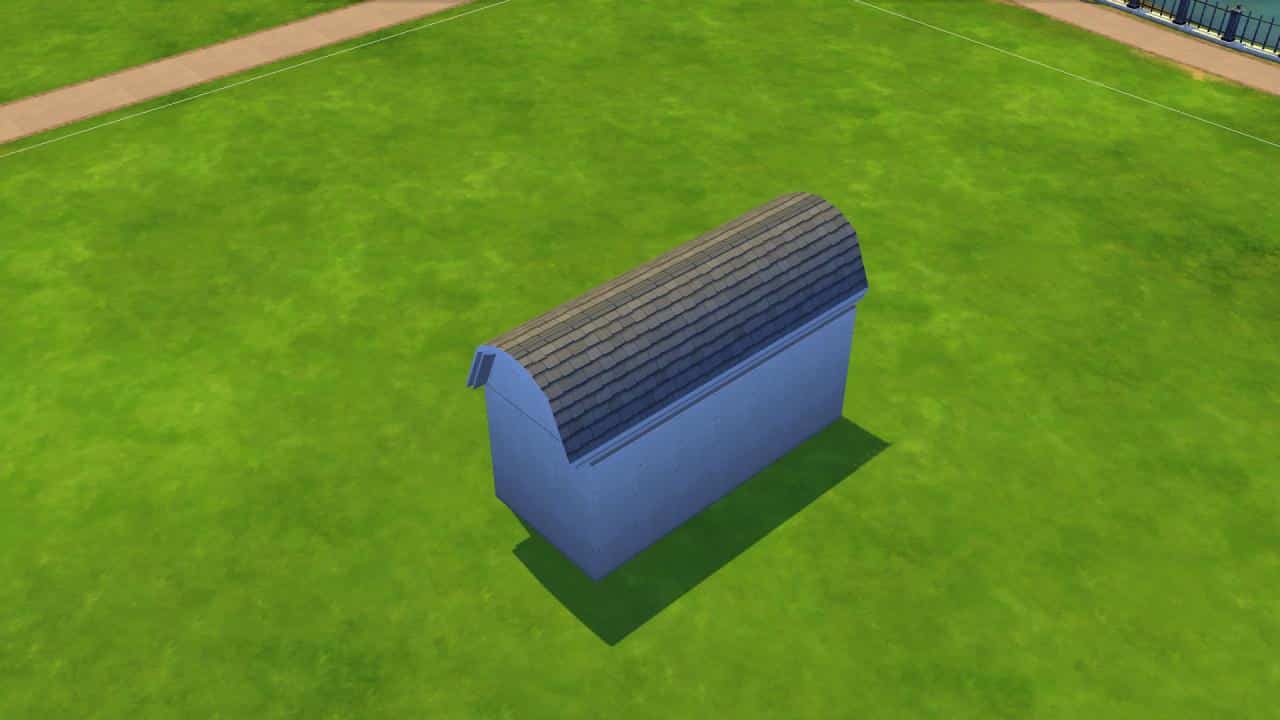
Barrel-vaulted roofs are popular for fallout shelters, storage units, and some types of farm buildings. They are very simple to make, too. All you need is a square or rectangular room and one gabled roof piece.
Place the gabled piece on the room and stretch it out until it matches the size of the room. Then grab one of the circular ball icons on either side of the roof and drag it upwards as far as it will go until it creates a perfect half-circle shape. Since gabled pieces have eaves by default, you’ll want to pull those in by grabbing one of the arrow icons at the edge of the roof and pulling inward.
Bell


Bell roofs are popular on cathedral turrets and many different types of religious or ceremonial buildings. These are also quite simple to do. They require one octagonal-shaped room and one octagonal roof piece.
Make sure the room is even on all sides. Although it seems counter-intuitive, this actually means that the diagonal walls should be one tile shorter than the straight walls. This is because diagonal walls are a bit longer than straight walls. Then stretch an octagonal roof piece over the structure until it matches the size of the room. Use the up arrow to pull the pitch of the roof up as high as desired.
Now for the fun part. There is an advanced shortcut that will allow you to curve roof pieces more precisely. Press SHIFT+C with the roof piece selected and extra circular icons will appear on the sides for more curvature points. This mode also allows you to make smoother pitch adjustments. Pull the circle icons upward until they create a smooth bell shape.
To complete the bell roof look, these roofs typically have some kind of roof ornament at the very top. You can do that by enabling the cheat bb.moveobjects on, selecting your desired roof piece from the roof décor section, then using the 9 key to raise it to your desired height at the very top of the roof. We used a piece of base game roof décor and sized it down a bit using the [ key.
Butterfly


Butterfly roofs aren’t a common sight these days but they are a popular mid-century roof design. If you’re building a modern 60s or 70s suburban home, this roof style works well. All you need is a square or rectangular room and two half-gabled roof pieces.
Make sure the room is an even number of tiles wide. Then place a half-gabled piece on the room with the flat side facing outward. Stretch it out so that it is half the width of the room beneath it. Drag the pitch up or down to your desired height. Typically, butterfly roofs have a lower pitch. Then copy the roof piece and place it facing the opposite way on the other side of the room.
You will end up with the eaves overlapping in the centre which doesn’t look nice. This is where another neat shortcut comes in. You already know that you can pull the eaves in on both sides but what if you like the eaves on the other side? What if you only want to get rid of the eaves in the middle where it overlaps? Select the piece and hold down SHIFT while pulling in the side you want to adjust. Only the eaves on that side will be pulled in. You can pull the centre eaves in for a cleaner look to your butterfly roof without sacrificing the nice eaves on the outside.
Clerestory

Clerestory roofs can be useful for both single story homes and homes where one section is two stories but another section is only one story. You’ll need a square or rectangular room (or a room with a second story that’s smaller than the bottom story) and two half-gabled roof pieces.
If working with a one-story home, place a half-gabled roof on the room with the flat side facing inward and stretch it so that it is at least one or two tiles smaller than the width of the room. Pull the pitch up a bit higher. Then place a second half-gabled piece with the flat side also facing inward and drag it to meet the other roof piece. Drag the pitch to be about half the height of the other piece. Hold SHIFT while dragging in the inner eave of the smaller piece so it doesn’t cut through the wall.
If working with a two-story home, there is less adjustment needed. Just place a half gabled piece on the second story and another one on the bottom section. The roof sections will already be differing heights.
Combination

Combination roofs are a popular style for shotgun homes. It requires one rectangular or square room and two hipped roof pieces.
Place the first hipped roof piece and stretch it to match the length and width of the room. Then drag it down to a very low pitch. Then place another hipped roof on top that’s a couple tiles smaller in length and width than the room and raise the pitch to be slightly higher than the other roof piece. The important thing to remember here is to make sure the ridges of the pieces line up to create a seamless look. You may have to adjust the roof sizes until you get it right.
Conical

Conical roofs are great for castle turrets and other tower-like structures. They’re very easy. They require one octagonal room and one circular roof piece.
Following the same principles of the bell roof, make sure the octagonal room is an even length on all sides. Then stretch out a circular roof piece over it and drag upwards or downwards to your desired pitch. You can pull out or draw in the eaves as you wish.
Cross-Hipped


Cross-hipped roofs are ideal for L-shaped homes and are very popular in many suburban designs. You’ll need an L-shaped room, one hipped roof piece, and one half-hipped roof piece. Alternatively, you could also use two hipped pieces.
Stretch the hipped roof over one section and the half-hipped roof over the other section with the flat side ending in the centre of the hipped roof. Alternatively, you could also stretch a hipped roof all the way to the end of the second section, overlapping the first roof piece. Then just adjust the pitch until the height of both pieces match for a seamless look.
Curved


Curved roofs are good for container homes, trailers, and storage units. They’re exactly like barrel-vaulted roofs, just with a more subtle curvature. You’ll need a square or rectangular room and a gabled roof piece.
Stretch the gabled roof piece over the room and enable advanced roof adjustments with SHIFT+C while the roof piece is selected. You’ll be able to get a smoother, less intense curve this way. Adjust the curve of the roof until it’s a softer version of the barrel-vaulted roof shown earlier. Pull the eaves in if desired.
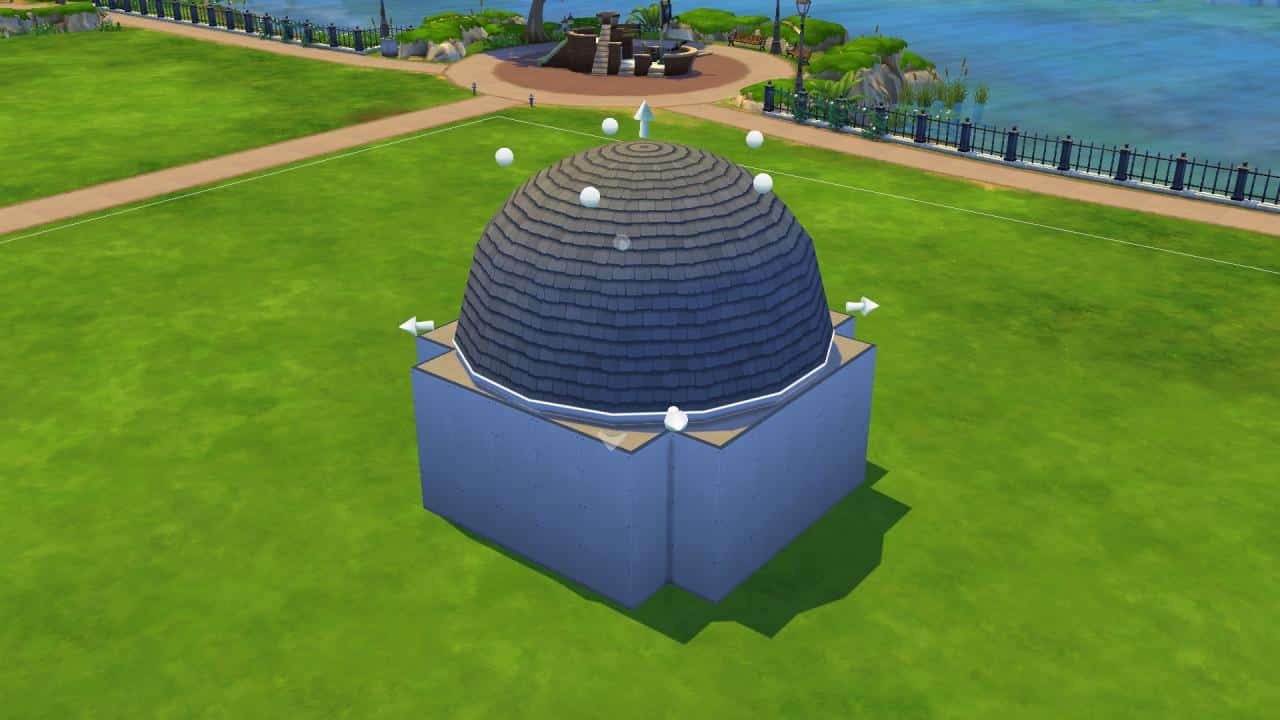
Dome


Dome roofs are the same as conical roofs, just with a different curvature. It requires one octagonal room and one circular roof piece.
Again, make sure the room is an even length on all sides. Then place the conical piece over it. Grab the circular icons along the sides of the roof and drag upwards until it creates a perfect dome over the structure. You will likely want to pull in the eaves on domed roofs but this creates the problem of the outer points of the octagonal room beneath it being visible. A good way to solve this problem is to use the thickest roof trim to cover that up.
Domed Vault


Domed vault roofs aren’t super common but they can be a really great design for cathedrals and ceremonial buildings. They are very eye catching. You’ll need a cross-shaped room, one circular roof piece, and four gabled roof pieces.
Drag the circular roof over the whole structure and drag the curve sharply upwards so it creates a perfect dome. Then place a gabled roof over any one of the outer edges and do the same thing until it’s a perfect barrel vault shape. Then copy the gabled roof piece and paste it three more times over the other exposed edges.
Dormer


Dormer roofs are great for attic spaces! If you own DLC, some of it may come with faux dormer roof décor you can add to your roof for a very quick dormer look. You can also build your own dormers. You’ll need a square or rectangular room with a small 2×3 room over it and two gabled roof pieces.
Stretch a gabled roof over the first floor and adjust the pitch upward so that it’s higher than the walls of the second room above it. Then stretch a second gabled piece over the smaller room above and adjust the pitch so that it does not rise higher than the roof on the first story.
Dropped Eaves


Dropped eave roofs are a great way to roof U-shaped buildings but they require at least two stories. You’ll need a U-shaped room on the first floor, a rectangular room on the second floor, a gabled roof piece, and two half-gabled roof pieces.
Drag a gabled roof over the second story and lower the pitch a bit. Then place a half-gabled roof over the exposed sections on the first story with the flat side facing inward. Play around with the pitch of both sections of roof until you have a seamless slant going from one piece to the next. Copy the half-gabled piece and paste it over the other exposed section.
Dutch Gable


A Dutch-gable roof is another popular shotgun style roof and is very similar to the combination roof, except it uses a gabled piece on top instead of a hipped piece. You’ll need a square or rectangular room, a gabled roof piece, and a hipped roof piece.
Drag the hipped piece over the room and make the pitch quite low, then drag out the gabled piece so it’s a few tiles smaller than the room on all sides and drag the pitch up a bit so it sticks out above the hipped roof. Adjust roof sizes as needed to get the ridges to match up.
Flat


Flat roofs are probably the easiest style of roof you can make. A lot of beginner builders default to flat roofs when they have trouble roofing their builds but flat roofs do look great on a lot of modern and commercial builds.
There’s a few different ways you can create a flat roof. One way is just to leave it alone and use the ceiling of the room as the roof. You can also place a platform over a room to give it a taller look and outline it with platform trims. You can use fences to outline a flat roof and even half walls.
Gable

Another super easy, tried-and-true roof style is the simple gable. No special instructions here. Just stretch a gabled roof piece over a square or rectangular room and adjust the pitch as desired. Pull out or bring in the eaves as desired.
Gambrel


Gambrel roofs are perfect for large rectangular buildings like barns and warehouses. They require one large rectangular room with another room above it that is at least 2-3 tiles smaller in width, a gabled roof piece, and two half-gabled roof pieces.
Stretch the gabled roof over the full length and width of the second story room, then place a half-gabled piece with the flat side facing inward on the exposed section of the bottom room on one side. Adjust the pitch of both the top and bottom roof pieces until they connect and create a clean ridge. Use SHIFT+C to pull the eaves in wherever they overlap each other. Then copy the half-gabled piece and paste it on the other side.
Hexagonal


Hexagonal roofs are not necessarily difficult. The difficult part is knowing what shape of room to use on the bottom. You’ll need an octagonal room and a hexagonal roof piece. Ironically, hexagonal rooms don’t work very well with hexagonal roof pieces.
Again, ensure the octagonal room is an even length on all sides. Then stretch the hexagonal roof piece over it and adjust pitch as desired. You may end up with the problem of the points of the room below it being visible and extending the eaves often looks bad. Use a thick roof trim to clean this up.
Hip and Valley

Hip and valley roofs are great for T-shaped structures. You’ll need a T-shaped room, a hipped roof piece, and a half-hipped roof piece.
Stretch the hipped roof piece over the longer section of the room. Then stretch the half-hipped piece over the smaller section with the flat side meeting the other roof piece in the middle.
Hip

Hip roofs are another easy one that don’t require any special instructions. Just stretch a hipped roof piece over a rectangular room and adjust pitch and eaves as desired.
Jerkinhead


Jerkinhead roofs are uncommon but they certainly make a statement. You’ll need a square or rectangular room with another room above it that’s at least 2-3 tiles smaller in width on both sides, a hipped roof piece, and two half-gabled pieces.
Stretch the hipped piece over the top room, then stretch a half-gabled piece over the exposed bottom section on one side with the flat side facing inward. Adjust the pitch of both pieces until they meet to form a seamless ridge. Pull in the inner eaves of the half-gabled roof. Then copy the half-gabled piece and paste it on the other side.
M-Shaped

M-shaped roofs are ideal for townhomes and other attached buildings. They are super simple, too. You’ll need a rectangular room and two gabled pieces.
Make sure the room is an even number of tiles wide. Then stretch a gabled piece over one half and another gabled piece over the other half. Pull in the inner eaves overlapping each other with SHIFT and adjust pitch as desired.
Mansard


Mansard roofs are very popular on Victorian homes but they can be a bit tricky to build. You’ll need a square or rectangular room with another room above it that is at least 2 tiles smaller on all sides, four half-gabled roof pieces, and four hipped roof pieces.
Place a half gabled piece against one side of the smaller room and drag the pitch upward until it meets the ceiling. Use SHIFT to pull in the eave here. Then copy that piece three times and place against the other three sides of the smaller room. Next, place a hipped roof piece at one of the exposed corners and stretch it large enough for the ridge to line up with the corner of the smaller room’s ceiling when dragged upwards. When you’ve achieved a seamless look, copy the hipped piece three times and place it on the other three corners. Pull out the eaves on the hipped pieces to match the gabled pieces or pull all the eaves in.
Monitor


Monitor roofs are popular in some seaside structures like boathouses. You’ll need a rectangular room with a smaller room above it and two gabled pieces.
Stretch a gabled piece over the entirety of the bottom room, going right through the smaller room on top. Then place another gabled piece above the smaller second room. Bring the pitch of the bottom roof up so that it covers most of the room above it and adjust the pitch of the second roof so that it slants at the same angle as the bottom roof.
Pyramid Hip

Pyramid hip roofs are super simple. The only thing you need to remember is that the room must be perfectly square. Place a hipped roof over a square room and adjust the eaves and pitch to your liking.
Saltbox
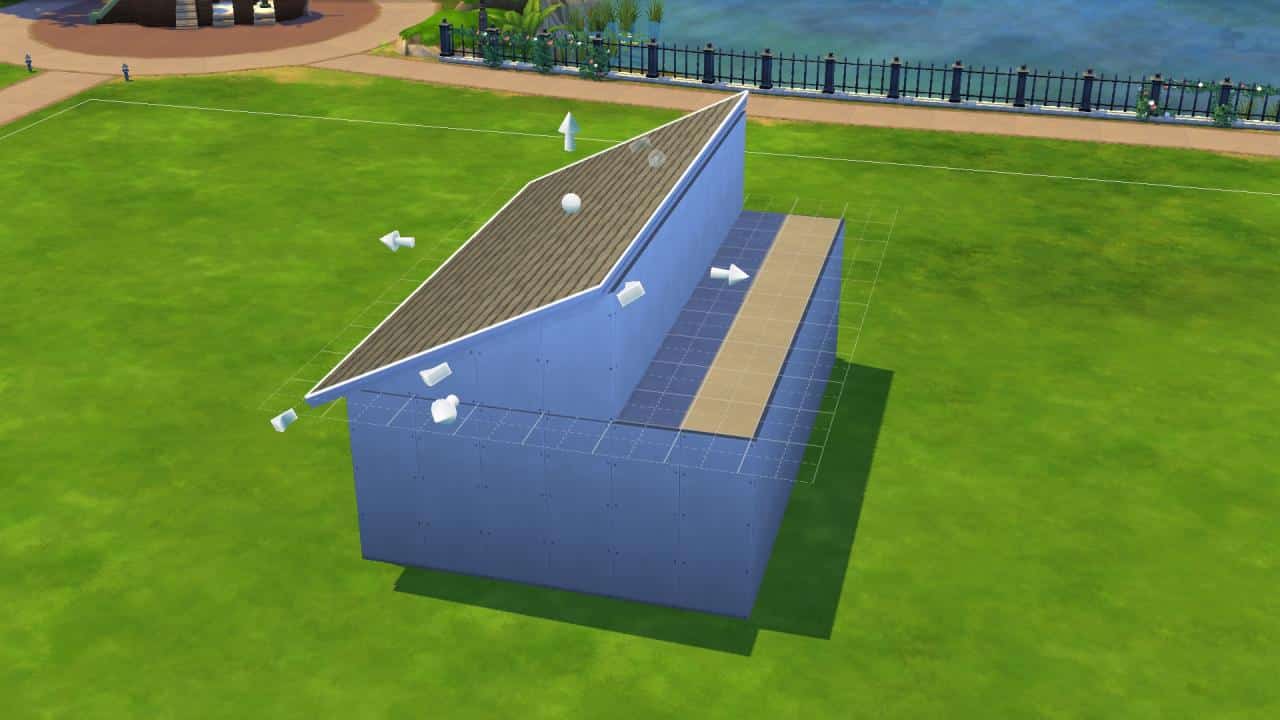

Saltbox roofs are useful for sheds and other farm buildings. They can be done with a single story or two stories where the second story is much smaller in width than the bottom story. You’ll need two half-gabled roof pieces.
For single story homes, stretch a half-gabled roof over a rectangular room with the flat side facing inward. The majority of the room should be covered but leave a small amount of space, at least 2 tiles, on one side. Then place a second half-gabled piece on the exposed side with the flat side facing inward. Drag the pitch up to meet the edge of the other roof piece and hold SHIFT to pull in the inner eaves of both pieces so they don’t overlap.
Sawtooth

Sawtooth roofs are popular on a lot of urban rowhouses. They’re very simple to do. You need a rectangular room and three (or more) half gabled roofs.
Stretch a half gabled roof over a small section of room, then place two more facing the same way. You can create a long stretch of sawtooth ridges just by repeating the same pattern. Sawtooth roofs look best when each section of roof is the same size and pitch. Hold SHIFT to pull in eaves wherever you don’t want them.
Shed

Shed roofs are best for… yep, you guessed it! Sheds! They can also be a nice roof style for a simple contemporary starter home. No special instructions required. Just stretch a half-gabled roof piece over a rectangular or square room and adjust pitch and eaves as desired.
Skillion

Skillion roofs are another option for T-shaped homes and offer a more modern look than hip and valley roofs. You’ll need a T-shaped room and two half-gabled roof pieces.
Stretch a half-gabled roof over the longer section of room and pull the pitch upward a bit. The flat side should face the smaller section of room. Then stretch another half-gabled piece over the smaller section of room with the flat side facing inwards. Bring the pitch down so that it sits slightly lower the larger section of roof.


3 Comments
Amazing, thank you! Bookmarking this
Thank you so much for this guide!
Dome is the grandest yet the hardest to work with. Here’s how I came up with a design https://i.ibb.co/SBcwy2Y/Screen-Shot-2021-01-12-at-20-41-01.png
Welcome to Sims Community!
Our community is about connecting people through open and thoughtful conversations. We want our readers to share their views and exchange ideas in a safe space.
In order to do so, we've created a simple set of rules that will improve your experience. Simply put, keep it civil.
Your post will/might be rejected if it contains:
User accounts will/might be blocked if we notice:
So, how can you be a power user?
Thanks for reading our community guidelines. Please note that we're aware of certain issues with Sign In / Log In and Create Account / Email Confirmation issues. We're working behind-the-scenes on a new Account Creation process. Thank you for your patience and remember - freedom of speech is not freedom of reach