
I and other CC creators get requests for graphic tees all the time. Graphic tees for very specific fandoms, funny sayings, just about anything you can put on a t-shirt, I’ve been asked to make it. I’m not always too interested in making all these graphic tees myself but the good news is, making graphic tees is one of the easiest pieces of CC you could possibly make. Seriously, anyone can do it and I’m going to teach you how.
This tutorial should be easy to follow for players who have never made any CC for The Sims 4 before but you will need to have some basic knowledge of how to navigate your computer and spend a bit of time familiarizing yourself with an image editing program of your choice. I will not be teaching you how to use your image editing program.
What You Will Need
- The Sims 4 base game
- Sims 4 Studio (create a free account on the forum to download the program)
- An image editor of your choice (I use Photoshop but Paint.NET is a great free alternative)
- A high-quality image of what you want to put on your graphic tee.
Extracting Your Texture

When you’re making a graphic tee, you’re making a recolour. Most of the time, you’ll want to make a standalone recolour so it’s easier to find in the CAS catalogue. So open up Sims 4 Studio and enter your creator name, then under the CAS tab, select Create CAS Standalone. Then hit the CAS button above it.
We’ll be making a graphic tee for adult females today so use the filters at the top to select the following: Human, Female, Adult, Clothing Top. Then type “tee” into the search field. All the female t-shirts in the game will pop up. Select one of the base game shirts in a light colour, preferably white. White bases are easier to edit. I chose the white v-neck tee pictured below.

Select your shirt and click Next. Then name your package file and save it to Documents > Electronic Arts > The Sims 4 > Mods. Name it something recognizable. Start with your creator name, then whatever the item is. For example, I named mine SWSailorMoonGraphicTee. Avoid special characters and spaces, as these can slow down the game on some low-end computers.

Once you’ve named your package file, the shirt will open in Sims 4 Studio. Click the Export button and give the texture file a name. I recommend something similar to your package name.
Editing Your T-Shirt
Leave Sims 4 Studio open in the background and switch over to your photo editing program. Remember, I am using Photoshop CS6 but you can use a free alternative, like Paint.NET.
Open the texture file you just exported in your image editing program along with the image you want to put on the t-shirt. It’s very important that the image you select is high quality. There is always going to be some loss of quality in the game so the higher quality your image is, the nicer it’s going to look in the game. A blurry, pixelated image is going to look awful in the game so get a really crisp, clear image that’s a decent size. It doesn’t need to be massive but it shouldn’t be a tiny thumbnail, either.

Copy the image and paste it onto a new layer over the t-shirt texture. It’s very important that the image be on a new layer. This will allow you to move and resize the image as needed without touching the t-shirt texture beneath it.
Resize and move the image around until it fits nicely in the centre of the t-shirt. You can also change the colour of the shirt if you like but this isn’t necessary. Once you’re happy with the placement of the image, save it as a .png file and name it something you can easily find.
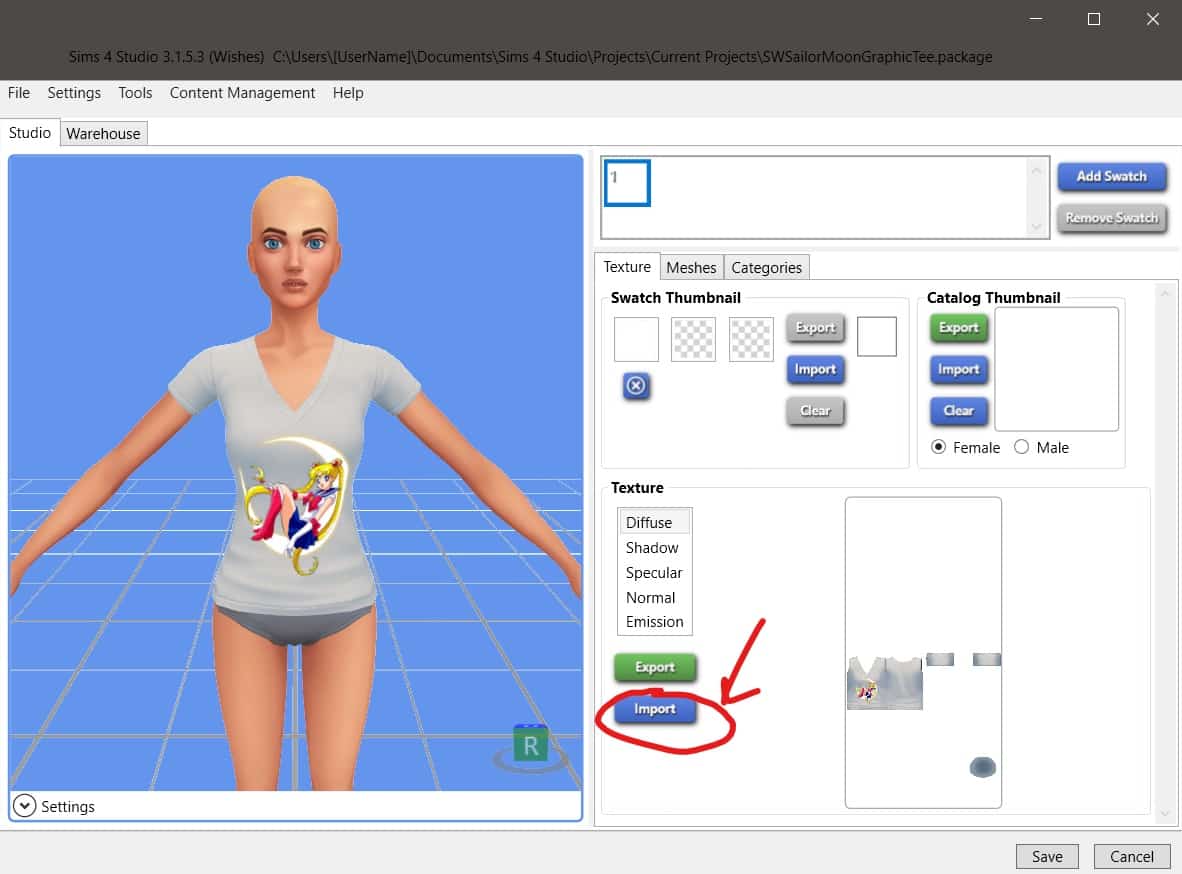
Importing Your Edited Texture
Switch back to Sims 4 Studio, select Import, then select the edited texture you just made. Voila! You now have a graphic tee! If you’re happy with how it looks, save it. If you want to adjust the placement or quality, just keep editing the texture file until you’re satisfied with it.
Remember, there is always going to be some loss of quality. If you zoom in very close, it will most likely look a bit pixelated no matter what you do, so don’t pull your hair out trying to get it to look as crystal clear as the original image. As long as it looks nice at a reasonable zoom level, you’ve done a good job.
Test Your New Tee

Load up the game and go into CAS with a Sim, then scroll through the top catalogue until you find the tee you made. Ta-Da! A brand new graphic tee for your Sims that you made all by yourself! Be proud!
Questions about this tutorial? Leave them here in the comments! I’ll do my best to help but keep in mind I won’t be answering questions about how to use your image editing program. There are lots of helpful tutorials for every image editing program out there that will be much more useful to you.


1 Comment
I Used paint and in CAS they are white like the manikins! HAHA, enjoyed making stuff though!
Welcome to Sims Community!
Our community is about connecting people through open and thoughtful conversations. We want our readers to share their views and exchange ideas in a safe space.
In order to do so, we've created a simple set of rules that will improve your experience. Simply put, keep it civil.
Your post will/might be rejected if it contains:
User accounts will/might be blocked if we notice:
So, how can you be a power user?
Thanks for reading our community guidelines. Please note that we're aware of certain issues with Sign In / Log In and Create Account / Email Confirmation issues. We're working behind-the-scenes on a new Account Creation process. Thank you for your patience and remember - freedom of speech is not freedom of reach